categories: Linux

Elastic movie encoding farm backed by AWS EC2 SpotFleet

Background: How do you keep your recordings ?

Recording TV into HDD is common use today. In addition to tech-savvies, many non-professional people always uses hdd recording. In Japan, almost all TV programs provided with MPEG2-TS. With Full HD qualiy, its bandwidth is going to be 12-20 Mbps. It seats roughly 20GB disk space when you are going to save 2 hours movie or sports program. As a result, many people suffer from a lot of occupied space in home’s hdd space. Including me. Some broadcast company may deny, but it is definitely true that stored movie is the part of his memory. He wants to keep them as long as possible. Saving them to HDD or cloud: seems straight forward, but not works.

Most easy and straight forward solution is move your recordings into another bulk HDD or cloud storage. But as a result of a few years activity, data size of your recordings may grow 10-50 TB. Many people are going to offload their recordings into monthly fixed rate cloud storage, so customer who do not pay much consumes a large part of storage capacity. It greatly exceeds cloud vendor’s forecast. I’ve heard that some user ware going to save 70TB data into cloud storage. Today, almost all cloud vendor declines monthly fixed rate cloud backup solutions and offers only “pay as you go” plans. Storing your recordings into bulk hdd is more reasonable from viewpoint of cost. But your huge recordings wastes your time so much. When you are going to move some “old” recordings into bulk hdd, it consomes a lot of time (It sometimes takes several days). When you’ve completed to move your old recordings, you may start to think about how to keep your backup healthy and can be read everytime. You may take a few hdd up into RAID in order to avoid data lost in case of HDD failure. As a result, you have to run several hdd 24/365 in addition to main disks. These disks looks ugly, makes some noise in your home, and make your home some geeky(Your friends may put off from you !).

Motivation: Heuristic Compression

Movie compression is one of hot topic among tech domain. Recentry, they have released cutting-edge H.265 compression codec it archivess rouchly 90% compression rate compaired with MPEG2-TS. If you have 20TB movie archive, it gonna be 2TB ! Disadvantage about H.265 is extraordinary long compression time. When you’re going to compress 2h movie, it will take about 50-80 hours. Fortunately, almost all movie compression task can be separated and run in parallel and can takes your compression time shorter. So here comes a need for multicore and multinode processing environment. As you know, heuristic compression is quite efficient, but it requires a lot computing resources. Its hard to estimate how much computing resources are required to do it done, but I think that you can make sense about you need for elastic computing cluster to do that. (My estimation is written below of this article.)

Torque and AWS EC2 Spot Fleet

Adaptive computing is long providing TORQUE batch scheduler which make each single computer up as cluster computer, and provides user aggregated computing resources. You can find TORQUE can do for at http://www.adaptivecomputing.com/products/open-source/torque/ . AWS EC2 Spot Fleet is capable for taking several EC2 Spot Instance into elastic cluster. You may know that EC2 Spot Instance is provided as “spare” AWS’s computing capacity, so it is provided at discounted pricing. You can use relatively higher computing resource with reasonable cost. You can see about AWS EC2 Spot Fleet here http://docs.aws.amazon.com/AWSEC2/latest/UserGuide/spot-fleet.html . I gonna mix them up.

The picture

Here is a picture I’ve compiled. Upper side show AWS. It consists from “API server” and “Encoding instances”. API Server acts as administrator of encoding servers and delivers certificate for each encoding instance in order to make VPN connection into my home. Lower side shows my home. TORQUE server and the data source is here. Nas provides source file to each encoding instance via VPN and receives compressed movie.

REST is modern RPC

When you’re going to take several instances properly configured, you have to communicate with each servers with proper manner, but your time is limited to develop actual code. You cannot choose complicated framework to do so. I believe that you want to make it easy about framework. Today, I think that REST API is most easy solution to communicate among each servers. REST uses http to communicate and you can call API with curl command. It’s super easy. On the server side, I use Flask( http://flask.pocoo.org/ ) to build API server. Flask is python library which can make api server so easy. You can write just 5 lines code and can work as http api server. I write two types of api server. 2. VPN certificate administrator I uses OpenVPN as VPS software. OpenVPN requires that each client should have unique certificate to make unique connection between server. So I have to manage which certificate is paid to instance, and which certificate has returned along with instance termination. 4. TORQUE computing node registrer TORQUE only has CLI interface to register/unregister incoming computing node for now. I’ve tweaked some REST api which receives http message from encoding instance and translate into CLI command to TORQUE server. I’ve successfully glued them up, and finally EC2 Spot instances starts working as a part of existing my home’s TORQUE cluster ! I’ve taken about 50 man hours at this point.

First run: take base info for estimation

I select AWS Ohio region as a place to expand spot instances. The reason is that Ohio region offers most cheap price about 4-core instance. AWS almost alway offers more cheap price against “previous generation” instance. At the first, I’ve played at North Virginia region, but it doesn’t offers previous generation 4-core instances and the price has frequentry changed. So I understand that N.Virginia region is so crowded and I cannot run computing jobs over 24 hours at there. Ohio region offers stable previous generation 4-core instances with cheap price and bidding price is more stable than N.Virginia. So I decide to play around at Ohio region. I decided to pay $0.03/hour per instance. Then, I’ve configured Spot Fleet and launched just one instance. I want to measure how long my computing task takes in order to estimate my budget to complete mission. Here is my first job execution time detail. This is the result of encoding roughly 2 hours movie.

  • Input Data Transfer: 18GB, 9 hours
  • Compression: roughly 30 hours
  • Output Data Transfer: up to 2.5GB, 1 hour

And Here is billing snapshot from AWS. * Data Transfer: $0.46 + $0.000 per GB - data transfer in per month: $0.00(45.294GB) + $0.000 per GB - first 1 GB of data transferred out per month: $0.00(1GB) + $0.090 per GB - first 10 TB / month data transfer out beyond the global free tier: $0.45(5.048GB)

  • Elastic Computing Cloud: $2.19

    • $0.0116 per On Demand Linux t2.micro Instance Hour: $0.58(50.254hrs)
    • c4.xlarge Linux/UNIX Spot Instance-hour in US East (Ohio): $1.19(45hrs)
    • EBS: $0.05 per 1 million I/O requests: $0.04(860,000IOs)
    • EBS: $0.05 per GB-month of Magnetic provisioned storage: $0.33(6.5GB-Mo)
  • Total: $2.68

Cost Estimation #1

So I can say that AWS costs about $3.00 per 2 hours encodings. Next, I gonna examine how many movies I have to compress. Along with my rough examination, I realised that I have roughly 1500 movies which have about 840 hours. So I can calcurate like this.

  • Total encoding time: 840 x (40(hrs) /2) = 16800 (hrs)

When I going to encode all of movies in reasonable time window, I should prepare like this.

  • Case1) 10 servers: 16800(hrs) / 10(svrs) = 1680(hrs) = 70 days
  • Case2) 20 servers: 16800(hrs) / 20(svrs) = 840(hrs) = 35 days

Hmm… 35 days encoding time(Case2) looks nice from my viewpoint. How much does it costs ? like this.

  • Case1): (70(days) * 24(hrs)) * ($3.00 / 2(hrs)) * 10(svr) = $25200.0
  • Case2): (35(days) * 24(hrs)) * ($3.00 / 2(hrs)) * 20(svr) = $25200.0

Damn. This cost is too huge to take for me.

Cost Estimations #2

Previous estimation is based on that encoding server have 4 vCPU(core). When I increased the number of vCPUs, I’ll not need a lot of servers. Ohaio Region also offers i2.8xlarge instance which have 32 vCPU and it can take 8 server’s task in 1 server. The price of i2.8xlarge is $0.83 per hour. Then, how much does it change costs ?

  • Encoding cost: 0.83 x 45(hrs) = $37.35 / 8(parallel) = $4.66 /cost per 2hours movie

Unfortunatelly, large size instance seems not help me so much.

Consequence

This trial shows possibilities for distributed computing cluster will help your piled-up recorded movies which sits in your storage. Unfortunately, heuristic compression on public cloud environment costs so much and your budget will not meet. I’ll try different approach and write about later. Stay tuned !

My Homebrewed IPTV transmitter(gen.4)

Hi, there. Long time no see. I’ve spending super-hard time to work, unfortunatelly. Recently, I’m so lucky to have some private time, so decide to write some code to transmit TV to Kodi.

history #1(Gen.1 transmitter,around 2000-2005)

Its so long time from I had disconnected terrestrial tv cable from my display and connect into IPTV box. My first experience is Sony’s “Location Free TV( https://en.wikipedia.org/wiki/LocationFree_Player )”. It’s proprietary product and limited in order to view programs via special software (and, it worked only on windows of cource !). I remember that my father had worked in Korea and I had told him to use this and he pleased to view Japanese TV in Korea. It’s one of my happy memory. At that time(and even now !), Japanese TV company was so much nervous about people transcode TV program into IP datagram and send to other location outside of his home. There was some reason to do such thing. There was a lot of tech-native and rogue young guys rip a lot of TV programs and movies and shared through P2P softwares(such as Winny, Share, and so on). That was difinitely a challenge to existing authorities, and people were afraid of their bothered behavior. Authorities tried to limit their challenge using every means, and finally nuked and wiped them practically. IPTV was also disappeared from the market in a form that involved collateral.

history #2(Gen.2, 2010-2014)

I had so tired about japanese closed product so much and switched almost all equipment to linux box including my home TV. Japanese homebrew hardware vendor Earthsoft( https://earthsoft.jp/ ) released PT1 which can receive and decode terrestrial and can be save as raw binary file into computer. It was landsliding phenomenon among tech savvies in Japan and tried to hack aboud. Currently japanese terrestrial broadcast is encrypted with MULTI2 protocol( https://ja.wikipedia.org/wiki/MULTI2 ) and cannot be decryted in simple way, but there is some decrypting software made by volunteer hacker with legal decrypting key(B-CAS card. This is sold with legal device.). (Note: There is a lot of discussion to decript terrestrial with legal key and homebrewed software) I won’t write detail, but purchased PT3(3rd gen Earthsoft’s terrestrial receiver) and connect them up into a linux box. I’ve sent decoded stream to gstreamer and forward to other linux box. I’ve finally succeed to view live TV at outside in adition inside of my home ! I’ve written transmitter and receiver using perl and it worked so good. Disclaimer: All of my terrestrial stream is decrypted using legal key and legal equipment.

history #3(Gen.3, 2014-2017)

Gstreamer is complete suite about media handling, but have some nervousness to treat transport stream. So gstreamer missed to catch media stream from trancoded terrestrial stream which includes some other information other than media stream itself. So, I’ve switched gstreamer into ffmpeg. I’ve modified my transmitter and receiver in order to fit ffmpeg. Ffmpeg did its job nicely. I’ve added additonal feature ffmpeg can transcode transpote stream into H.264 in case of narrow bandwith connection. This feature was so nice when I went business trip and want to view my subscribed TV channel.

Now(Gen.4, 2017-)

I’ve switched my linux box into Raspberry Pi 3 and Kodi. Kodi is sweat software to handle personal media content. Kodi also has smart controller works on android smartphone. Kodi also has feature to handle realtime TV stream and network video stream service such as YouTube in addition to saved media content. I’ve rewritten again my transmitter Kodi can receive stream in proper way. Kodi can receive realtime TV as HTTP live streaming(HLS) and I’ve hacked my transmitter to work as HLS server. My transmitter can reply my subscribed channels and realtime media stream along with HLS manner. Source code is here( https://github.com/mkiuchi/epgrec-kodi-backend ). Now, I can see my tv in my home and outside, I can have my smart remote controller, and low-powered receiver !

Conclusion

IPTV for terrestrial is niche. Almost all people view authorized network tv such as Hulu, NetFlix, dTV, and so on. Additinaly, people spent their times in SNSs and tons of CGMs. So demand for transport terrestrial into IPTV gonna be still niche, I think. But I’m happy, for now.

TAP TST10 and munin

powerload-day

TAP-TST10 is most cheapest power consumption monitoring device currently in Japan. I’ve evaluated and find some pros and cons.

The Device

SANWA Supply sells valious device around daily consumer computing use in Japan and sells “Watt Checker” series in order to measure power consumption of your digital device such as your laptop computer and in-house servers. You can just see current value using most of devices, can send it out to other computer via USB cable using TAP-TST10 and it costs about $50 in the street in contrast to other devices which costs about $200. So I gonna try to connect them and see some. Some good guy archived linux box to identify TAP-TST10.(link) I’ve written some wrapper script for munin-node and it works fine.

Pros

Cheapest power measurement device which have USB output connection among Japan.

Cons

Undisclosed protocol for USB connection. There is some failure when you connect.

Comments

Most of Japanese devices around power measurement have poor and insufficiently disclosed function and expensive. It needs to be improved.

Make your own script with systemd

Recent linux system uses systemd instead of SysV init. So you cannot use /etc/rc.local for your housekeeping script with systemd, I’ve tried to migrate my own script with systemd environment. Here is my example which works one time per system startup.

1. make your own script(example: /root/synchome.sh

 1
 2
 3
 4
 5
 6
 7
 8
 9
10
11
12
13
14
15
16
17
18
19
20
21
22
23
24
25
26
27
28
#!/bin/sh
#
# my home directory
#
DAT=`date`
echo "script start $DAT" > /root/log
BKF=`find /mnt/nfs/flyback/flyback -mindepth 1 -maxdepth 1|grep -v lock|sort|tail -1`
# wait until autofs mount is ready
while [ "$BKF" = "" ]; do
   BKF=`find /mnt/nfs/flyback/flyback -mindepth 1 -maxdepth 1|grep -v lock|sort|tail -1`
done
if [ -d $BKF ] ; then
   DIRPRFX="/home/mkiuchi/"
   BKF=$BKF$DIRPRFX
   echo "source directory $BKF" >> /root/log
   rsync -auvz --delete --ignore-errors $BKF $DIRPRFX >> /root/log 2>&1
   # clean chromium lock file
   if [ -L "/home/mkiuchi/.config/chromium/SingletonLock" ]; then
     echo "found chromium lockfile" >> /root/log
     rm -f /home/mkiuchi/.config/chromium/SingletonLock
   fi
else
   echo "backupfile not found. aborted." >> /root/log
   exit
fi

DAT=`date`
echo "script end $DAT" >> /root/log

2. make configuration file for systemd(example: /root/synchome.service)

 1
 2
 3
 4
 5
 6
 7
 8
 9
10
11
12
[Unit]
Description=Home Directory Synchronization
Require=autofs.service
After=autofs.service

[Service]
Type=oneshot
ExecStart=/root/synchome.sh
RemainAfterExit=yes

[Install]
WantedBy=multi-user.target

3. chmod 755 /root/synchome.sh

4. cd /etc/systemd/system ; ln -s /root/synchome.service .

5. systemctl daemon-reload

I cannot determine how to identify the work of systemd, so my own script writes own log.

Sense temparature and humidity at your home

Long time no see. What’s up ? I’ve been working hard for about a year and have no time to write blog. Here is old story but I’ve not written yet.

You always take some attension about tomorrows weather and current temparature and humidity roughly. “Today is cold”, “Today is dry”, “Today is moist”…and so on. When you know temparature and humidity correctly, your feeling go more clear ? Of course, it gonna be cheap. OK, here is my trial. My budget doesn’t exceed over $200.

I’ve decided to use Strawberry Linux’s USBRH-FG sensor. You can buy it from this URL «http://strawberry-linux.com/catalog/items?code=52002>>. It costs about $50. Here is the photo if USBRH-FG.

I’ve decided to measure outside temparature and humidity, so USBRH should go into outside and should be resistant from rain, wind, and sunlight in order to take correct measure. Here is diagram about my installation. USBRH is installed into weather resistant case and its output is converted into Cat5 cable. It doesn’t mean that output of USBRH is converted to TCP/IP. It’s absolutely USB protocol which runs inside of Cat5 cable. Cat5 cable is also weak against outside weather, so I’ve covered Cat5 cable with ordinary PVC pipe.

I’ve decided to connect my server and USBRH device with USB expander in order to connect between inside of my home and outside. USB cable cannot extend more than 5 meter, so I’ve bought usb expander and connect about 20m between USBRH device and server, and it costs about $60. Here is photo of usb expander.

Here is a part of my installation. I’ve bought some weather proof case to be installed at nearest home depot. I’ve set USBRH with some small box and punched some small holes in order for outside air and moisture to go through into box moderately.

OK, here is software turn. I’ve installed USBRH linux driver into my server from here ( http://green-rabbit.sakura.ne.jp/usbrh/ ). It shows current temparature and humidity like this. Unit of temparature is celsius.

# cat /proc/usbrh/0/status
t:23.42 h:67.38

I’ve also installed munin ( http://munin-monitoring.org/ ) in order to store sensed data and see log-term movement of temparature and humidity. I’ve written some plugin for munin to work with USBRH sensor.

#!/bin/sh
# -*- sh -*-

: << =cut

=head1 NAME

Plugin for USBRH - Plugin to measure USBRH device's temparature and humidity. 

=head1 NOTES

Especially the average and max values on the bigger graphs (yearly) can be interesting.

=head1 AUTHOR

Contributed by Mitsutoshi Kiuchi

=head1 LICENSE

GPLv2

=head1 MAGIC MARKERS

 #%# family=auto
 #%# capabilities=autoconf

=cut

. /usr/share/munin/plugins/plugin.sh

MODEL="USBRH"

if [ "$1" = "autoconf" ]; then
    echo yes
    exit 0
fi

if [ "$1" = "config" ]; then

    echo graph_title "$MODEL outside"
    echo 'graph_args --base 1000 -l 0 '
    echo 'graph_scale no'
    echo 'graph_vlabel Celsius'
    echo 'graph_category sensors'
    echo 'usbrht.label temparature'
    echo 'usbrhh.label humidity'
    print_warning load
    print_critical load
    exit 0
fi

TEMP=`cat /proc/usbrh/0/temperature`
RH=`cat /proc/usbrh/0/humidity`
echo "usbrht.value $TEMP"
echo "usbrhh.value $RH"

and, here is sample output.

Wow, it’s good looking.

Expand your home LAN to internet using OpenVPN

I’m UNIX guy and loves ssh to connect other servers, but I have to configure ssh-tunneling every time when I want to use other port than 22/tcp. SSH-tunneling is suit for me in some view. SSH-tunneling can go through SOCKS proxy, but this work is very little thing but just a little bit stressful for me. There is some limitation about ssh-tunneling. Some protocol such as Windows file sharing needs UDP and ssh-tunneling cannot treat with it. Your underling network configuration is bound by your local network, so you cannot resolve your home server’s host name using your home DNS server. So, I’ve tried to dig external network to my home network using OpenVPN.

1. Overview

OpenVPN is a little difficult to think about.

  1. OpenVPN allows several style of connection such as point-to-point and access server(one server-to-many client). I’ve chosen access server style configuration. Under this configuration, One access server wait for connection from client. When connection established, server acts as gateway to your home network.
  2. OpenVPN uses SSL, so you have to setup several certificate which is need to establish SSL network connection.
  3. OpenVPN allows several authentification when you are going to establish VPN connection. password authentication, certificate authentification, and both of them.
OpenVPN also has many many feature. If you want to know what OpenVPN can do, please refer ["What is OpenVPN?" page](http://openvpn.net/index.php/open-source/333-what-is-openvpn.html).

2. Big Picture for test

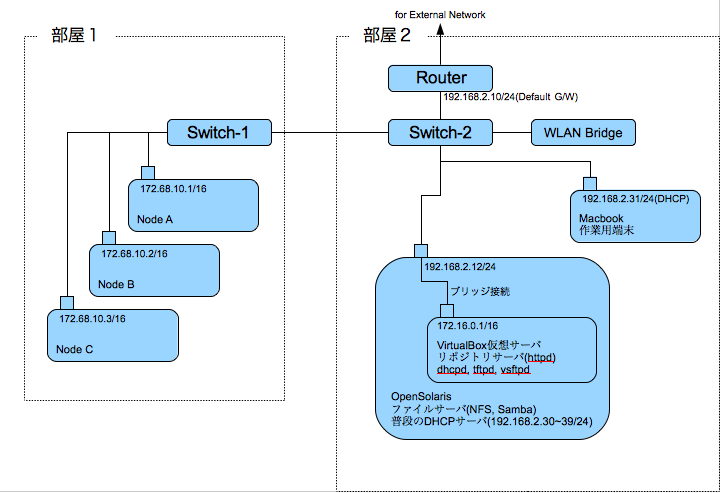
So, I’m going to try to deploy testing environment. Here is big-picture about testing environment.

You can see one server in “My Home” area. This server is virtualized with kvm and software switch using bridge-utils. There are three virtual server on one physical server and one virtual server of thee is OpenVPN server. “My Home” LAN and WAN is separated with gateway and access from external network is limited, but I’ve set that (B):1194/udp goes directly to 192.168.0.103:1194/udp and vice versa.

Also you can see one notebook in “Public Access/Company” area. This notebook is Windows and I’ve installed OpenVPN client, some certificate and keys. When this notebook try to connect to “My Home”’s OpenVPN server, this notebook is going to connect to (B):1194/udp. When negotiation between OpenVPN server and client success, virtual network adapter which address is 192.168.0.200/24 is created on notebook and some packet belonging to 192.168.0.0/24 is encrypted and goes through virtual network which is written in pink color line at picture above and arrives to 192.168.0.103/24, then packets is decrypted and goes from 192.168.0.103 to some address in 192.18.0.0/24 subnet. This is written in blue line at picture above.

You should use UDP for VPN connection instead of TCP. Please read “Why TCP Over TCP Is A Bad Idea”. Therefore any protocol over ssh is also bad idea because you accumulate using TCP stack as a result. When you use TCP over UDP, UDP act as (maybe lossy) network link and UDP doesn’t care about timeout and retransmission, but TCP does it instead of underling UDP. But some company permits only TCP to go through proxy server. So OpenVPN also supports to use TCP for VPN connection.

3. Environment

Ok. Now let me start to deplyment.

  • OpenVPN Server: Scientific Linux 6
  • kernel: 2.6.32-131.2.1.el6.x86_64
  • openvpn-2.1.4-1.el6.x86_64
  • also uses bridge-utils and openssl
  • OpenVPN Client: Windows 7
  • OpenVPN for Windows

4. How to deploy environment

4.1. install Schientific Linux 6 and OpenVPN package

I’ve installed Scientific Linux 6 into virtual host. Virtual hosts including this OpenVPN server is connected to bridge device and goes through physical ethernet interface. Then I’ve installed openvpn-2.1.4-1.el6.x86_64 using yum command.

# yum install openvpn 

Do not forget to disable SELinux and Firewall.

4.2. Create some public/private key pairs

OpenVPN requires some public key certificate/private key pair for mutual authentification. You have to create three pairs at least.

  • for CA(Certificate Authority)
  • for Server(OpenVPN server)
  • for Client(OpenVPN client)

I drew type of certificates and which component should be installed to server and client.

4.2.1. Create your CA’s certificate and private key

Under Scientific Linux 6 environment, you can create your CA’s certificate and private key easy. Red character shows what you should type.

# cd /usr/share/openvpn/easy-rsa/2.0
# . ./vars
# ./clean-all
# ./build-ca
Generating a 1024 bit RSA private key
.................++++++
..++++++
writing new private key to 'ca.key'
-----
You are about to be asked to enter information that will be incorporated
into your certificate request.
What you are about to enter is what is called a Distinguished Name or a DN.
There are quite a few fields but you can leave some blank
For some fields there will be a default value,
If you enter '.', the field will be left blank.
-----
Country Name (2 letter code) [US]:<your country>
State or Province Name (full name) [CA]:<your province>
Locality Name (eg, city) [SanFrancisco]:<your city>
Organization Name (eg, company) [Fort-Funston]:<your organizaton>
Organizational Unit Name (eg, section) []:
Common Name (eg, your name or your server's hostname) [Fort-Funston CA]:<your hostname>
Name []:
Email Address [me@myhost.mydomain]:
# ls keys
ca.crt  ca.key  index.txt  serial
# cat keys/ca.crt 
-----BEGIN CERTIFICATE-----
MIIDezCCAuSgAwIBAgIJAKIB35vl1bhxMA0GCSqGSIb3DQEBBQUAMIGGMQswCQYD
(snip)
ehatRw9UmWMPz+ASZ/VW8M0DXs/TgZd5FAXg7DtP9Q==
-----END CERTIFICATE-----
# cat keys/ca.key
-----BEGIN PRIVATE KEY-----
MIICdgIBADANBgkqhkiG9w0BAQEFAASCAmAwggJcAgEAAoGBALUUl0Uk9mrHhVdH
(snip)
xvndx7Vqja46rg==
-----END PRIVATE KEY-----
#

4.2.2. Create certificate and private key for OpenVPN server

This operation is continuous from 4.2.1.

# ./build-key-server server
Generating a 1024 bit RSA private key
.................++++++
..++++++
writing new private key to 'server.key'
-----
You are about to be asked to enter information that will be incorporated
into your certificate request.
What you are about to enter is what is called a Distinguished Name or a DN.
There are quite a few fields but you can leave some blank
For some fields there will be a default value,
If you enter '.', the field will be left blank.
-----
Country Name (2 letter code) [US]:<your country>
State or Province Name (full name) [CA]:<your province>
Locality Name (eg, city) [SanFrancisco]:<your city>
Organization Name (eg, company) [Fort-Funston]:<your organizaton>
Organizational Unit Name (eg, section) []:
Common Name (eg, your name or your server's hostname) [Fort-Funston CA]:<your hostname>
Name []:
Email Address [me@myhost.mydomain]: 

Please enter the following 'extra' attributes
to be sent with your certificate request
A challenge password []:<your challenge password, blank is allowed>
An optional company name []:
Using configuration from /usr/share/openvpn/easy-rsa/2.0/openssl.cnf
Check that the request matches the signature
Signature ok
The Subject's Distinguished Name is as follows
countryName           : PRINTABLE:'JP'
stateOrProvinceName   : PRINTABLE:'Tokyo'
localityName          : PRINTABLE:'Shinagawa'
organizationName      : PRINTABLE:'mycompany'
commonName            : PRINTABLE:'myserver.mydoamin'
emailAddress          :IA5STRING:'me@myhost.mydomain'
Certificate is to be certified until Jul 19 12:38:58 2021 GMT (3650 days)
Sign the certificate? [y/n]:y

1 out of 1 certificate requests certified, commit? [y/n]y
Write out database with 1 new entries
Data Base Updated
# ls keys
01.pem  ca.key     index.txt.attr  serial      server.crt  server.key
ca.crt  index.txt  index.txt.old   serial.old  server.csr
# cat keys/server.crt 
Certificate:
   Data:
       Version: 3 (0x2)
       Serial Number: 1 (0x1)
       Signature Algorithm: sha1WithRSAEncryption
       Issuer: C=JP, ST=Tokyo, L=Shinagawa, O=mycompany, CN=myserver.mydomain/emailAddress=me@myhost.mydomain
       Validity
           Not Before: Jul 22 12:38:58 2011 GMT
           Not After : Jul 19 12:38:58 2021 GMT
       Subject: C=JP, ST=Tokyo, L=Shinagawa, O=mycompany, CN=myserver.mydoamin/emailAddress=me@myhost.mydomain
       Subject Public Key Info:
           Public Key Algorithm: rsaEncryption
               Public-Key: (1024 bit)
               Modulus:
                   00:d2:38:76:8a:af:4c:c5:fc:94:e9:a0:c6:49:93:
                   59:ef:16:99:af:8b:e3:8f:69:fa:e4:09:eb:be:c4:
                   7f:e2:4b:db:cb:f4:64:f1:d9:42:29:9b:3c:ff:8f:
                   60:60:cf:9c:33:10:51:05:cf:9c:04:fb:da:e3:8f:
                   5e:a6:7f:11:b4:39:fd:74:75:72:38:20:af:89:f0:
                   f7:ab:ad:3d:90:21:bd:0e:07:ab:f4:0b:ec:b7:cb:
                   3e:d8:37:76:86:91:e2:16:c6:92:37:b8:62:16:8e:
                   ff:9c:87:f9:98:c6:09:a1:7f:bc:28:dc:70:bc:7a:
                   7b:1e:a4:0c:9b:e7:4b:ba:d9
               Exponent: 65537 (0x10001)
       X509v3 extensions:
           X509v3 Basic Constraints:
               CA:FALSE
           Netscape Cert Type:
               SSL Server
           Netscape Comment:
               Easy-RSA Generated Server Certificate
           X509v3 Subject Key Identifier:
               18:9C:4E:40:03:C1:E0:EE:58:D2:C8:D0:78:80:ED:BA:B2:41:03:2E
           X509v3 Authority Key Identifier:
               keyid:33:B9:D8:5A:98:06:DA:B1:B1:7E:EC:75:C3:85:32:7B:63:7D:71:C1
               DirName:/C=JP/ST=Tokyo/L=Shinagawa/O=mycompany/CN=myserver.mydomain/emailAddress=me@myhost.mydomain
               serial:A2:01:DF:9B:E5:D5:B8:71

           X509v3 Extended Key Usage:
               TLS Web Server Authentication
           X509v3 Key Usage:
               Digital Signature, Key Encipherment
   Signature Algorithm: sha1WithRSAEncryption
       85:0b:14:5d:03:d7:c0:80:2a:b1:b5:de:60:d0:1f:dc:aa:b6:
       b4:0e:f4:c8:8e:3f:0d:90:43:b0:f1:e0:69:cd:d3:4f:40:cf:
       76:5f:f4:d6:60:44:ca:49:c9:b5:b0:fa:a4:3f:ba:19:e5:d9:
       6e:f2:f5:b3:70:53:0b:be:c4:aa:2c:f2:a5:89:4f:c1:d3:9a:
       1c:f5:16:63:f6:ab:b4:0c:36:97:07:a3:a7:99:65:84:36:b1:
       03:25:8f:32:ca:54:62:c3:e2:73:e8:ef:19:19:bd:2d:6a:f3:
       29:3e:3a:bc:54:b5:45:c8:a7:b0:54:e4:eb:f0:38:f2:0a:b9:
       0a:6a
-----BEGIN CERTIFICATE-----
MIID3TCCA0agAwIBAgIBATANBgkqhkiG9w0BAQUFADCBhjELMAkGA1UEBhMCSlAx
(snip)
VGLD4nPo7xkZvS1q8yk+OrxUtUXIp7BU5OvwOPIKuQpq
-----END CERTIFICATE-----
# cat keys/server.key
-----BEGIN PRIVATE KEY-----
MIICeAIBADANBgkqhkiG9w0BAQEFAASCAmIwggJeAgEAAoGBANI4doqvTMX8lOmg
(snip)
bZgJU2uKuRfpVqTd
-----END PRIVATE KEY-----
#

4.2.3. Create certificate and private key for OpenVPN client

This operation is continuous from 4.2.2.

# ./build-key client
Generating a 1024 bit RSA private key
.................++++++
..++++++
writing new private key to 'client.key'
-----
You are about to be asked to enter information that will be incorporated
into your certificate request.
What you are about to enter is what is called a Distinguished Name or a DN.
There are quite a few fields but you can leave some blank
For some fields there will be a default value,
If you enter '.', the field will be left blank.
-----
Country Name (2 letter code) [US]:<your country>
State or Province Name (full name) [CA]:<your province>
Locality Name (eg, city) [SanFrancisco]:<your city>
Organization Name (eg, company) [Fort-Funston]:<your organizaton>
Organizational Unit Name (eg, section) []:
Common Name (eg, your name or your server's hostname) [Fort-Funston CA]:<your hostname>
Name []:
Email Address [me@myhost.mydomain]: 

Please enter the following 'extra' attributes
to be sent with your certificate request
A challenge password []:<your challenge password, blank is allowed>
An optional company name []:
Using configuration from /usr/share/openvpn/easy-rsa/2.0/openssl.cnf
Check that the request matches the signature
Signature ok
The Subject's Distinguished Name is as follows
countryName           : PRINTABLE:'JP'
stateOrProvinceName   : PRINTABLE:'Tokyo'
localityName          : PRINTABLE:'Shinagawa'
organizationName      : PRINTABLE:'mycompany'
commonName            : PRINTABLE:'myserver.mydoamin'
emailAddress          :IA5STRING:'me@myhost.mydomain'
Certificate is to be certified until Jul 19 12:38:58 2021 GMT (3650 days)
Sign the certificate? [y/n]:y

1 out of 1 certificate requests certified, commit? [y/n]y
Write out database with 1 new entries
Data Base Updated
# ls keys
01.pem  ca.key      client.key      index.txt.attr.old  serial.old  server.key
02.pem  client.crt  index.txt       index.txt.old       server.crt
ca.crt  client.csr  index.txt.attr  serial              server.csr
# cat keys/client.crt 
Certificate:
   Data:
       Version: 3 (0x2)
       Serial Number: 2 (0x2)
       Signature Algorithm: sha1WithRSAEncryption
       Issuer: C=JP, ST=Tokyo, L=Shinagawa, O=mycompany, CN=myserver.mydomain/emailAddress=me@myhost.mydomain
       Validity
           Not Before: Jul 22 13:03:27 2011 GMT
           Not After : Jul 19 13:03:27 2021 GMT
       Subject: C=JP, ST=Tokyo, L=Shinagawa, O=mycompany, CN=myclient.mydomain/emailAddress=me@myhost.mydomain
       Subject Public Key Info:
           Public Key Algorithm: rsaEncryption
               Public-Key: (1024 bit)
               Modulus:
                   00:c7:55:17:b5:88:8b:9b:64:83:24:f4:fb:80:b7:
                   67:93:2c:40:e9:cb:96:6e:08:3e:f6:b3:df:06:f4:
                   8c:e6:ed:f4:90:07:0e:a1:1a:77:50:6e:e1:40:e5:
                   79:4e:96:08:e4:78:26:59:56:c0:29:27:b0:ed:fd:
                   1f:3d:6b:63:86:ba:3f:39:04:3c:a5:57:d5:b3:5c:
                   92:f3:59:6f:10:0e:be:ad:57:ab:aa:3a:34:17:60:
                   81:69:60:75:73:29:32:ec:84:66:02:53:ff:83:2b:
                   ad:32:d5:e3:aa:0e:25:ab:c1:95:04:35:db:af:f2:
                   83:4d:71:a3:d0:55:90:04:7d
               Exponent: 65537 (0x10001)
       X509v3 extensions:
           X509v3 Basic Constraints:
               CA:FALSE
           Netscape Comment:
               Easy-RSA Generated Certificate
           X509v3 Subject Key Identifier:
               CD:13:BC:C7:57:2B:8D:3F:C1:E2:66:A8:5A:7B:47:2D:43:0E:96:DD
           X509v3 Authority Key Identifier:
               keyid:33:B9:D8:5A:98:06:DA:B1:B1:7E:EC:75:C3:85:32:7B:63:7D:71:C1
               DirName:/C=JP/ST=Tokyo/L=Shinagawa/O=mycompany/CN=myserver.mydomain/emailAddress=me@myhost.mydomain
               serial:A2:01:DF:9B:E5:D5:B8:71

           X509v3 Extended Key Usage:
               TLS Web Client Authentication
           X509v3 Key Usage:
               Digital Signature
   Signature Algorithm: sha1WithRSAEncryption
       81:3d:3c:21:ad:ff:92:9a:d0:1f:1f:10:26:b8:00:cf:e6:06:
       59:20:d9:0d:0e:bf:ba:2c:c3:20:54:32:b6:c3:49:6a:9a:31:
       fb:b2:ed:0d:37:90:6b:10:41:71:23:38:f5:d8:ac:dc:39:9e:
       97:0d:1f:dd:a8:9e:9e:7c:32:75:91:75:ea:80:76:e2:e6:b4:
       51:44:32:d4:a5:9b:e4:28:36:88:34:9c:8a:c5:ee:09:94:f3:
       9e:f9:1b:fc:31:df:42:a4:79:17:65:73:4c:d1:d4:cc:76:b3:
       a7:fb:4f:b6:dd:c8:86:fb:bc:84:93:db:d1:8e:8c:65:64:a8:
       58:93
-----BEGIN CERTIFICATE-----
MIID3TCCA0agAwIBAgIBATANBgkqhkiG9w0BAQUFADCBhjELMAkGA1UEBhMCSlAx
(snip)
joxlZKhYkw==
-----END CERTIFICATE-----
# cat keys/client.key
-----BEGIN PRIVATE KEY-----
MIICdQIBADANBgkqhkiG9w0BAQEFAASCAl8wggJbAgEAAoGBAMdVF7WIi5tkgyT0
(snip)
BBMuuJRvG/fC
-----END PRIVATE KEY-----
#

4.2.4. Generate Diffie-Hellman parameter

For OpenVPN server you have to generate your own Diffie-Hellman parameter.

# cd /usr/share/openvpn/easy-rsa/2.0/
# ./build-dh
Generating DH parameters, 1024 bit long safe prime, generator 2
This is going to take a long time
..............................................................................................................+..............................................................................................+.......................+........................+......+..................+............................................+.........................+..........................+..........................................................+.......................+.................+............................................+................++*++*++*
# ls keys
01.pem  ca.key      client.key  index.txt.attr      serial      server.csr
02.pem  client.crt  dh1024.pem  index.txt.attr.old  serial.old  server.key
ca.crt  client.csr  index.txt   index.txt.old       server.crt
# cat keys/dh1024.pem
-----BEGIN DH PARAMETERS-----
MIGHAoGBAOn6qlt6EnKXCCKXiA6BPEw0ZWsJbA3+LjSCY6Zn2dBQF48HqvdEDtEF
Mib+p/scL3BdeN11rpQ4/oIMzTgHXitJsahb5wbzlMhjvSyQucKqfjrOVsG/ZOYo
Onzrlty926EluiPNA/PP98UNNQCskXR9pKrc4LTAn99fbujr4E9zAgEC
-----END DH PARAMETERS-----
#

4.3. Create OpenVPN configuration file

By default, there is no file under /etc/openvpn. Refer /usr/share/doc/openvpn/sample-config-files and create your own configuration.

This is configuration file I modified and placed as /etc/openvpn/server.conf. Red charactor is modified.

#################################################
# Sample OpenVPN 2.0 config file for            #
# multi-client server.                          #
#                                               #
# This file is for the server side              #
# of a many-clients  one-server              #
# OpenVPN configuration.                        #
#                                               #
# OpenVPN also supports                         #
# single-machine  single-machine             #
# configurations (See the Examples page         #
# on the web site for more info).               #
#                                               #
# This config should work on Windows            #
# or Linux/BSD systems.  Remember on            #
# Windows to quote pathnames and use            #
# double backslashes, e.g.:                     #
# "C:\\Program Files\\OpenVPN\\config\\foo.key" #
#                                               #
# Comments are preceded with '#' or ';'         #
#################################################

# Which local IP address should OpenVPN
# listen on? (optional)
;local a.b.c.d

# Which TCP/UDP port should OpenVPN listen on?
# If you want to run multiple OpenVPN instances
# on the same machine, use a different port
# number for each one.  You will need to
# open up this port on your firewall.
port 1194

# TCP or UDP server?
;proto tcp
proto udp

# "dev tun" will create a routed IP tunnel,
# "dev tap" will create an ethernet tunnel.
# Use "dev tap0" if you are ethernet bridging
# and have precreated a tap0 virtual interface
# and bridged it with your ethernet interface.
# If you want to control access policies
# over the VPN, you must create firewall
# rules for the the TUN/TAP interface.
# On non-Windows systems, you can give
# an explicit unit number, such as tun0.
# On Windows, use "dev-node" for this.
# On most systems, the VPN will not function
# unless you partially or fully disable
# the firewall for the TUN/TAP interface.
dev tap0
;dev tun

# Windows needs the TAP-Win32 adapter name
# from the Network Connections panel if you
# have more than one.  On XP SP2 or higher,
# you may need to selectively disable the
# Windows firewall for the TAP adapter.
# Non-Windows systems usually don't need this.
;dev-node MyTap

# SSL/TLS root certificate (ca), certificate
# (cert), and private key (key).  Each client
# and the server must have their own cert and
# key file.  The server and all clients will
# use the same ca file.
#
# See the "easy-rsa" directory for a series
# of scripts for generating RSA certificates
# and private keys.  Remember to use
# a unique Common Name for the server
# and each of the client certificates.
#
# Any X509 key management system can be used.
# OpenVPN can also use a PKCS #12 formatted key file
# (see "pkcs12" directive in man page).
ca /usr/share/openvpn/easy-rsa/2.0/keys/ca.crt
cert /usr/share/openvpn/easy-rsa/2.0/keys/server.crt
key /usr/share/openvpn/easy-rsa/2.0/keys/server.key  # This file should be kept secret

# Diffie hellman parameters.
# Generate your own with:
#   openssl dhparam -out dh1024.pem 1024
# Substitute 2048 for 1024 if you are using
# 2048 bit keys.
dh /usr/share/openvpn/easy-rsa/2.0/keys/dh1024.pem

# Configure server mode and supply a VPN subnet
# for OpenVPN to draw client addresses from.
# The server will take 10.8.0.1 for itself,
# the rest will be made available to clients.
# Each client will be able to reach the server
# on 10.8.0.1. Comment this line out if you are
# ethernet bridging. See the man page for more info.
;server 10.8.0.0 255.255.255.0

# Maintain a record of client  virtual IP address
# associations in this file.  If OpenVPN goes down or
# is restarted, reconnecting clients can be assigned
# the same virtual IP address from the pool that was
# previously assigned.
;ifconfig-pool-persist ipp.txt

# Configure server mode for ethernet bridging.
# You must first use your OS's bridging capability
# to bridge the TAP interface with the ethernet
# NIC interface.  Then you must manually set the
# IP/netmask on the bridge interface, here we
# assume 10.8.0.4/255.255.255.0.  Finally we
# must set aside an IP range in this subnet
# (start=10.8.0.50 end=10.8.0.100) to allocate
# to connecting clients.  Leave this line commented
# out unless you are ethernet bridging.
;server-bridge 10.8.0.4 255.255.255.0 10.8.0.50 10.8.0.100
server-bridge 192.168.0.103 255.255.255.0 192.168.0.200 192.168.0.210

# Configure server mode for ethernet bridging
# using a DHCP-proxy, where clients talk
# to the OpenVPN server-side DHCP server
# to receive their IP address allocation
# and DNS server addresses.  You must first use
# your OS's bridging capability to bridge the TAP
# interface with the ethernet NIC interface.
# Note: this mode only works on clients (such as
# Windows), where the client-side TAP adapter is
# bound to a DHCP client.
;server-bridge

# Push routes to the client to allow it
# to reach other private subnets behind
# the server.  Remember that these
# private subnets will also need
# to know to route the OpenVPN client
# address pool (10.8.0.0/255.255.255.0)
# back to the OpenVPN server.
;push "route 192.168.10.0 255.255.255.0"
;push "route 192.168.20.0 255.255.255.0"
push "route 192.168.0.0 255.255.255.0"

# To assign specific IP addresses to specific
# clients or if a connecting client has a private
# subnet behind it that should also have VPN access,
# use the subdirectory "ccd" for client-specific
# configuration files (see man page for more info).

# EXAMPLE: Suppose the client
# having the certificate common name "Thelonious"
# also has a small subnet behind his connecting
# machine, such as 192.168.40.128/255.255.255.248.
# First, uncomment out these lines:
;client-config-dir ccd
;route 192.168.40.128 255.255.255.248
# Then create a file ccd/Thelonious with this line:
#   iroute 192.168.40.128 255.255.255.248
# This will allow Thelonious' private subnet to
# access the VPN.  This example will only work
# if you are routing, not bridging, i.e. you are
# using "dev tun" and "server" directives.

# EXAMPLE: Suppose you want to give
# Thelonious a fixed VPN IP address of 10.9.0.1.
# First uncomment out these lines:
;client-config-dir ccd
;route 10.9.0.0 255.255.255.252
# Then add this line to ccd/Thelonious:
#   ifconfig-push 10.9.0.1 10.9.0.2

# Suppose that you want to enable different
# firewall access policies for different groups
# of clients.  There are two methods:
# (1) Run multiple OpenVPN daemons, one for each
#     group, and firewall the TUN/TAP interface
#     for each group/daemon appropriately.
# (2) (Advanced) Create a script to dynamically
#     modify the firewall in response to access
#     from different clients.  See man
#     page for more info on learn-address script.
;learn-address ./script

# If enabled, this directive will configure
# all clients to redirect their default
# network gateway through the VPN, causing
# all IP traffic such as web browsing and
# and DNS lookups to go through the VPN
# (The OpenVPN server machine may need to NAT
# or bridge the TUN/TAP interface to the internet
# in order for this to work properly).
;push "redirect-gateway def1 bypass-dhcp"

# Certain Windows-specific network settings
# can be pushed to clients, such as DNS
# or WINS server addresses.  CAVEAT:
# http://openvpn.net/faq.html#dhcpcaveats
# The addresses below refer to the public
# DNS servers provided by opendns.com.
;push "dhcp-option DNS 208.67.222.222"
;push "dhcp-option DNS 208.67.220.220"
# This is DNS server of my home
push "dhcp-option DNS 192.168.0.101"

# Uncomment this directive to allow different
# clients to be able to "see" each other.
# By default, clients will only see the server.
# To force clients to only see the server, you
# will also need to appropriately firewall the
# server's TUN/TAP interface.
client-to-client

# Uncomment this directive if multiple clients
# might connect with the same certificate/key
# files or common names.  This is recommended
# only for testing purposes.  For production use,
# each client should have its own certificate/key
# pair.
#
# IF YOU HAVE NOT GENERATED INDIVIDUAL
# CERTIFICATE/KEY PAIRS FOR EACH CLIENT,
# EACH HAVING ITS OWN UNIQUE "COMMON NAME",
# UNCOMMENT THIS LINE OUT.
;duplicate-cn

# The keepalive directive causes ping-like
# messages to be sent back and forth over
# the link so that each side knows when
# the other side has gone down.
# Ping every 10 seconds, assume that remote
# peer is down if no ping received during
# a 120 second time period.
keepalive 10 120

# For extra security beyond that provided
# by SSL/TLS, create an "HMAC firewall"
# to help block DoS attacks and UDP port flooding.
#
# Generate with:
#   openvpn --genkey --secret ta.key
#
# The server and each client must have
# a copy of this key.
# The second parameter should be '0'
# on the server and '1' on the clients.
;tls-auth ta.key 0 # This file is secret

# Select a cryptographic cipher.
# This config item must be copied to
# the client config file as well.
;cipher BF-CBC        # Blowfish (default)
;cipher AES-128-CBC   # AES
;cipher DES-EDE3-CBC  # Triple-DES

# Enable compression on the VPN link.
# If you enable it here, you must also
# enable it in the client config file.
comp-lzo

# The maximum number of concurrently connected
# clients we want to allow.
;max-clients 100

# It's a good idea to reduce the OpenVPN
# daemon's privileges after initialization.
#
# You can uncomment this out on
# non-Windows systems.
;user nobody
;group nobody

# The persist options will try to avoid
# accessing certain resources on restart
# that may no longer be accessible because
# of the privilege downgrade.
persist-key persist-tun

# Output a short status file showing
# current connections, truncated
# and rewritten every minute.
status /var/log/openvpn-status.log

# By default, log messages will go to the syslog (or
# on Windows, if running as a service, they will go to
# the "\Program Files\OpenVPN\log" directory).
# Use log or log-append to override this default.
# "log" will truncate the log file on OpenVPN startup,
# while "log-append" will append to it.  Use one
# or the other (but not both).
log         /var/log/openvpn.log
log-append  /var/log/openvpn.log

# Set the appropriate level of log
# file verbosity.
#
# 0 is silent, except for fatal errors
# 4 is reasonable for general usage
# 5 and 6 can help to debug connection problems
# 9 is extremely verbose
verb 4

# Silence repeating messages.  At most 20
# sequential messages of the same message
# category will be output to the log.
;mute 20

client-cert-not-required
username-as-common-name
# Each user require user name and password
plugin /usr/lib64/openvpn/plugin/lib/openvpn-auth-pam.so login
management localhost 7505

And edit some script to work with OpenVPN.

/etc/openvpn/bridge-start

#!/bin/bash

#################################
# Set up Ethernet bridge on Linux
# Requires: bridge-utils
#################################

# Define Bridge Interface
br="br0"

# Define list of TAP interfaces to be bridged,
# for example tap="tap0 tap1 tap2".
tap="tap0"

# Define physical ethernet interface to be bridged
# with TAP interface(s) above.
eth="eth0"
eth_ip="192.168.0.103"
eth_netmask="255.255.255.0"
eth_broadcast="192.168.0.255"

for t in $tap; do
   openvpn --mktun --dev $t
done

brctl addbr $br
brctl addif $br $eth

for t in $tap; do
   brctl addif $br $t
done

for t in $tap; do
   ifconfig $t 0.0.0.0 promisc up
done

ifconfig $eth 0.0.0.0 promisc up

ifconfig $br $eth_ip netmask $eth_netmask broadcast $eth_broadcast

/etc/openvpn/bridge-stop

#!/bin/bash

####################################
# Tear Down Ethernet bridge on Linux
####################################

# Define Bridge Interface
br="br0"

# Define list of TAP interfaces to be bridged together
tap="tap0"

ifconfig $br down
brctl delbr $br

for t in $tap; do
   openvpn --rmtun --dev $t
done

/etc/openvpn/openvpn-startup

#!/bin/sh
/etc/openvpn/bridge-start

/etc/openvpn/openvpn-shutdown

#!/bin/sh
/etc/openvpn/bridge-stop
ifdown eth0
ifup eth0

And modify /etc/init.d/openvpn to work with these scripts.

# Location of openvpn binary
openvpn=""
openvpn_locations="/usr/sbin/openvpn /usr/local/sbin/openvpn"
for location in $openvpn_locations
do
 if [ -f "$location" ]
 then
   openvpn=$location
 fi
done

# Lockfile
lock="/var/lock/subsys/openvpn"

# PID directory
piddir="/var/run/openvpn"

# Our working directory
work=/etc/openvpn

# Source function library.
. /etc/rc.d/init.d/functions

# Source networking configuration.
. /etc/sysconfig/network

# Check that networking is up.
if [ ${NETWORKING} = "no" ]
then
 echo "Networking is down"
 exit 0
fi

# Check that binary exists
if ! [ -f  $openvpn ]
then
 echo "openvpn binary not found"
 exit 0
fi

# See how we were called.
case "$1" in
 start)
   echo -n $"Starting openvpn: "

   /sbin/modprobe tun >/dev/null 2>&1

   # From a security perspective, I think it makes
   # sense to remove this, and have users who need
   # it explictly enable in their --up scripts or
   # firewall setups.

   #echo 1 > /proc/sys/net/ipv4/ip_forward

    # Run startup script, if defined
    if [ -f $work/openvpn-startup ]; then
    $work/openvpn-startup
    fi

   if [ ! -d  $piddir ]; then
       mkdir $piddir
   fi

   if [ -f $lock ]; then
       # we were not shut down correctly
       for pidf in `/bin/ls $piddir/*.pid 2>/dev/null`; do
         if [ -s $pidf ]; then
   	kill `cat $pidf` >/dev/null 2>&1
         fi
         rm -f $pidf
       done
       rm -f $lock
       sleep 2
   fi

   rm -f $piddir/*.pid
   cd $work

   # Start every .conf in $work and run .sh if exists
   errors=0
   successes=0
   for c in `/bin/ls *.conf 2>/dev/null`; do
       bn=${c%%.conf}
       if [ -f "$bn.sh" ]; then
   	. ./$bn.sh
       fi
       rm -f $piddir/$bn.pid
           # Handle backward compatibility, see Red Hat Bugzilla ID #458594
           script_security=''
           if [ -z "$( grep '^[[:space:]]*script-security[[:space:]]' $c )" ]; then
               script_security="--script-security 2"
           fi
       $openvpn --daemon --writepid $piddir/$bn.pid --config $c --cd $work $script_security
       if [ $? = 0 ]; then
   	successes=1
       else
   	errors=1
       fi
   done

   if [ $errors = 1 ]; then
       failure; echo
   else
       success; echo
   fi

   if [ $successes = 1 ]; then
       touch $lock
   fi
   ;;
 stop)
   echo -n $"Shutting down openvpn: "
   for pidf in `/bin/ls $piddir/*.pid 2>/dev/null`; do
     if [ -s $pidf ]; then
       kill `cat $pidf` >/dev/null 2>&1
     fi
     rm -f $pidf
   done

    # Run shutdown script, if defined
    if [ -f $work/openvpn-shutdown ]; then
    $work/openvpn-shutdown
    fi

   success; echo
   rm -f $lock
   ;;
 restart)
   $0 stop
   sleep 2
   $0 start
   ;;
 reload)
   if [ -f $lock ]; then
       for pidf in `/bin/ls $piddir/*.pid 2>/dev/null`; do
   	if [ -s $pidf ]; then
   	    kill -HUP `cat $pidf` >/dev/null 2>&1
   	fi
       done
   else
       echo "openvpn: service not started"
       exit 1
   fi
   ;;
 reopen)
   if [ -f $lock ]; then
       for pidf in `/bin/ls $piddir/*.pid 2>/dev/null`; do
   	if [ -s $pidf ]; then
   	    kill -USR1 `cat $pidf` >/dev/null 2>&1
   	fi
       done
   else
       echo "openvpn: service not started"
       exit 1
   fi
   ;;
 condrestart)
   if [ -f $lock ]; then
       $0 stop
       # avoid race
       sleep 2
       $0 start
   fi
   ;;
 status)
   if [ -f $lock ]; then
       for pidf in `/bin/ls $piddir/*.pid 2>/dev/null`; do
   	if [ -s $pidf ]; then
   	    kill -USR2 `cat $pidf` >/dev/null 2>&1
   	fi
       done
       echo "Status written to /var/log/messages"
   else
       echo "openvpn: service not started"
       exit 1
   fi
       ;;
 *)
   echo "Usage: openvpn {start|stop|restart|condrestart|reload|reopen|status}"
   exit 1
   ;;
esac
exit 0

4.4. Enable OpenVPN service

Finally, enable and start OpenVPN service.

# chkconfig openvpn on
# service openvpn start

Check /var/log/openvpn.log that initialization sequence has been completed.

Fri Jul 22 23:08:54 2011 us=512618 Initialization Sequence Completed

5. Prepare your Windows OpenVPN client

There is many OpenVPN related project now. You feels that OpenVPN configuration is not easy so you want to use some GUI client and I admit. But as far as I know and after my trial, I can say that there is NO GUI client which treats OpenVPN function correctly including official packages.

The best way you can do about Windows client, you should install and use CUI instead of GUI.

5.1. Download and install OpenVPN Windows binary

From OpenVPN download page, you should download windows binary. After download has completed execute package to install.

5.2. Prepare certificate, private key, and configuration file

At 4.2.3. you’ve created certificate and private key for client. Copy them into “C:¥Program Files(x86)¥OpenVPN¥config”. And copy certificate of CA(ca.crt) to same place(“C:¥Program Files(x86)¥OpenVPN¥config”).

And you have to create configuration file as “C:¥Program Files(x86)¥OpenVPN¥config¥client.ovpn”. Here is my example. Red character is modified. You should edit with editor which can handle LF as line feed code. It may be mistake that it set to CR+LF.

##############################################
# Sample client-side OpenVPN 2.0 config file #
# for connecting to multi-client server.     #
#                                            #
# This configuration can be used by multiple #
# clients, however each client should have   #
# its own cert and key files.                #
#                                            #
# On Windows, you might want to rename this  #
# file so it has a .ovpn extension           #
##############################################

# Specify that we are a client and that we
# will be pulling certain config file directives
# from the server.
client

# Use the same setting as you are using on
# the server.
# On most systems, the VPN will not function
# unless you partially or fully disable
# the firewall for the TUN/TAP interface.
dev tap
;dev tun

# Windows needs the TAP-Win32 adapter name
# from the Network Connections panel
# if you have more than one.  On XP SP2,
# you may need to disable the firewall
# for the TAP adapter.
;dev-node MyTap

# Are we connecting to a TCP or
# UDP server?  Use the same setting as
# on the server.
;proto tcp
proto udp

# The hostname/IP and port of the server.
# You can have multiple remote entries
# to load balance between the servers.
remote myserver.mydomain 1194
;remote my-server-2 1194

# Choose a random host from the remote
# list for load-balancing.  Otherwise
# try hosts in the order specified.
;remote-random

# Keep trying indefinitely to resolve the
# host name of the OpenVPN server.  Very useful
# on machines which are not permanently connected
# to the internet such as laptops.
resolv-retry infinite

# Most clients don't need to bind to
# a specific local port number.
nobind

# Downgrade privileges after initialization (non-Windows only)
;user nobody
;group nobody

# Try to preserve some state across restarts.
persist-key
persist-tun

# If you are connecting through an
# HTTP proxy to reach the actual OpenVPN
# server, put the proxy server/IP and
# port number here.  See the man page
# if your proxy server requires
# authentication.
;http-proxy-retry # retry on connection failures
;http-proxy [proxy server] [proxy port #]

# Wireless networks often produce a lot
# of duplicate packets.  Set this flag
# to silence duplicate packet warnings.
;mute-replay-warnings

# SSL/TLS parms.
# See the server config file for more
# description.  It's best to use
# a separate .crt/.key file pair
# for each client.  A single ca
# file can be used for all clients.
ca ca.crt
cert client.crt
key client.key

# Verify server certificate by checking
# that the certicate has the nsCertType
# field set to "server".  This is an
# important precaution to protect against
# a potential attack discussed here:
#  http://openvpn.net/howto.html#mitm
#
# To use this feature, you will need to generate
# your server certificates with the nsCertType
# field set to "server".  The build-key-server
# script in the easy-rsa folder will do this.
ns-cert-type server

# If a tls-auth key is used on the server
# then every client must also have the key.
;tls-auth ta.key 1

# Select a cryptographic cipher.
# If the cipher option is used on the server
# then you must also specify it here.
;cipher x

# Enable compression on the VPN link.
# Don't enable this unless it is also
# enabled in the server config file.
comp-lzo

# Set log file verbosity.
verb 3

# Silence repeating messages
;mute 20

And create user name and password file. I created it as “C:¥Program Files(x86)¥OpenVPN¥config¥auth.cfg”. This file is plain text and line 1 should contain user name and line 2 should contain password.

username
password

Finally create batch file to execute OpenVPN connection.

cd C:¥Program Files(x86)¥OpenVPN¥config
openvpn --client --config client.ovpn --remote myserver.mydomain --proto udp --auth-user-pass auth.cfg

If you want to go through sock proxy when you are about to connect, do like this.

cd C:¥Program Files(x86)¥OpenVPN¥config
openvpn --client --config client.ovpn --remote myserver.mydomain --proto udp --socks-proxy socksserver.yourdomain --auth-user-pass auth.cfg

6. Try your OpenVPN connection

Execute command and confirm that your attempt to try is succeed.

Enjoy your broaden home network !

Remote desktop trial using SPICE protocol via mobile broadband connection

This post is continued story from these posts ( 1, 2, 3 ).

Previously I tried SPICE protocol as alternative of Microsoft’s RDP, but at that time SPICE protocol was very early development so I could not satisfy my needs to use in daily use. But situation has changed. RHEL 6 has included SPICE protocol for VDI, so I’ve tried once again.

1. Environment

  • Physical Host: Scientific Linux 6

  • kernel: 2.6.32-71.el6.x86_64

  • qemu-kvm-0.12.1.2-2.160.el6_1.2.x86_64

  • spice-server-0.8.0-1.el6.x86_64

  • Virtual Desktop: Fedora 15(i686)

  • kernel: 2.6.38.8-35.fc15.i686.PAE

  • xorg-x11-drv-qxl-0.0.21-3.fc15.i686

I’ve also used DNS, ddclient, and some router for this trial.(not written in this post)

2. Create Physical host

First, I’ve created normal kvm host. After the installation, I’ve also installed spice-server via yum.

3. Create Virtual Desktop

This procedure is just a little bit complex. First, I’ve created virtual machine using virt-manager and installed Fedora 15. But virt-manager only treat with VNC connection, so I’ve changed the configuration of virtual machine to work with SPICE.

4. Modify configuration to work with SPICE

After the installation, I’ve dumped configuration of virtual machine to XML file.

1
2
3
4
5
(at Guest OS)
# halt -p
(at Host OS)
# virsh dumpxml <virtual machine name> > <XML filename>
# virsh undefine <virtual machine name>

and edit XML file. Red charactor shows changes from original XML file.

 1
 2
 3
 4
 5
 6
 7
 8
 9
10
11
12
13
14
15
16
17
18
19
20
21
22
23
24
25
26
27
28
29
30
31
32
33
34
35
36
37
38
39
40
41
42
43
44
45
46
47
48
49
50
51
52
53
54
55
56
57
58
59
60
61
62
63
64
65
66
<domain type='kvm'>
  <name>f15</name>
  <uuid>4845a1da-cf61-62dc-783c-d0bff899b68e</uuid>
  <memory>786432</memory>
  <currentMemory>786432</currentMemory>
  <vcpu>1</vcpu>
  <os>
    <type arch='i686' machine='rhel6.1.0'>hvm</type>
    <boot dev='hd'/>
    <boot dev='cdrom'/>
  </os>
  <features>
    <acpi/>
    <apic/>
    <pae/>
  </features>
  <clock offset='utc'/>
  <on_poweroff>destroy</on_poweroff>
  <on_reboot>restart</on_reboot>
  <on_crash>restart</on_crash>
  <devices>
    <emulator>/usr/libexec/qemu-kvm</emulator>
    <disk type='file' device='cdrom'>
      <driver name='qemu' type='raw'/>
      <source file='/mnt/storage/cdimg/fedora/Fedora-15-i386-netinst.iso'/>
      <target dev='hdc' bus='ide'/>
      <readonly/>
      <address type='drive' controller='0' bus='1' unit='0'/>
    </disk>
    <disk type='file' device='disk'>
      <driver name='qemu' type='raw'/>
      <source file='/home/vm/f15.img'/>
      <target dev='vda' bus='virtio'/>
      <address type='pci' domain='0x0000' bus='0x00' slot='0x05' function='0x0'/>
    </disk>
    <controller type='ide' index='0'>
      <address type='pci' domain='0x0000' bus='0x00' slot='0x01' function='0x1'/>
    </controller>
    <interface type='bridge'>
      <mac address='52:54:00:c1:29:97'/>
      <source bridge='br0'/>
      <target dev='vnet4'/>
      <model type='virtio'/>
      <address type='pci' domain='0x0000' bus='0x00' slot='0x03' function='0x0'/>
    </interface>
    <serial type='pty'>
      <target port='0'/>
    </serial>
    <console type='pty'>
      <target port='0'/>
    </console>
    <input type='tablet' bus='usb'/>
    <input type='mouse' bus='ps2'/>
    <graphics type='spice' port='5930' autoport='no' listen='0.0.0.0'/>
    <sound model='ac97'>
      <address type='pci' domain='0x0000' bus='0x00' slot='0x04' function='0x0'/>
    </sound>
    <video>
      <model type='qxl' vram='32768' heads='1'/>
      <address type='pci' domain='0x0000' bus='0x00' slot='0x02' function='0x0'/>
    </video>
    <memballoon model='virtio'>
      <address type='pci' domain='0x0000' bus='0x00' slot='0x06' function='0x0'/>
    </memballoon>
  </devices>
</domain>

After the edit I defined virtual machine again.

1
# virsh define /home/vm/f15.xml

After definition, I cannot see console in virt-manager anymore. The reason is that virt-manager doesn’t support SPICE. So I issued virsh command to boot virtual machine.

1
# virsh start f15

5. Connect virtual machine from Windows client

Windows client bianry can be downloded from spice-space.org. I’ve downloaded spice-client-win32-0.6.3.zip and spice_libs_win32_063_and_earlier.zip.

After download, I unzipped both package and moved spicec.exe to libs directory for spicec.exe works with some libraries.

6. User Experience

I’ve tried. See movie.

7. Conclusion

SPICE protocol works good with mobile broadband and LAN connection, but you will feel some stress about some multimedia experience. SPICE connection via mobile broadband will consume about 800kbps bandwidth from my experience.

Enjoy.

Samba Winbind Trial Log

In the past and UNIX world, people who want aggregate authentication repository always used NIS. Several company and guys still may use NIS now, I heard from some colleague. We UNIX people can use LDAP for centralized authentication. Old days, all of company worker were walking around UNIX sysadmin, but now many of them live in Windows world and uses Active Directory for authentication and UNIX people have to fit them to AD. Thanks to desired samba community, we can use winbind and UNIX server can talk to AD, join itself to AD-forrest and user who is not registered in local authentication can log in UNIX server. I tried to create test environment similar to real world, and confirmed that my Linux box can talk AD server. I will write how-to for other people who want to try. 1. Environment

  • Windows Server: I’ve tried Windows Server 2008.
  • Linux Box: (also I’ve tried) Scientific Linux 6.0 (x86_64).
  1. Install Windows Server, create Active Directory repository, and create user account for test

First, I installed Windows Server 2008 into my test box. After I installed Windows Server 2008, I created Active Directory. If you haven’t experienced how to create AD, please see my screenshot below.

After the installation, you will see the welcome window. Please choose “Add Role” link.

You’ll see welcome window of “Add Role”. Click Next.

You can choice the role what you want. Choose “Active Directory Domain Service”, and click Next. (You may doubt whether you should also install “DNS Server”. As notification says, you have not to install DNS Server in this time. After the installation of Active Directory Domain Service, you will configure Active Directory forrest. In this configuration, configuration wizard asks whether you install DNS server or not.)

After the installation, you will have to reboot server. After reboot, launch dcpromo.exe.

This is welcome window of dcpromo.exe. I’ve chosen “Detailed installation mode”.

In the Windows world, there is some security setting for contemporary client such as Windows Vista and Windows 7. Unfortunately I have not enough knowledge about these security setting, so I chose “Windows 2003” level of security because I suspect that may sysadmin is now using Windows Server 2003 in the real world…

Make new AD-forest.

Specify the name for new AD forest. This name will be the part of FQDN. Each hostname under this AD will be ..

Specify the name for NetBIOS. I don’t know enough knowledge about NetBIOS, but many people says that you should specify same name as forest name.

Specify the level of function for this forest. I chose “Windows 2003” as I wrote just before.

Specify the option for this installation. I chose “DNS Server” because I’ve heard that AD must be worked with DNS. Some guru may know how to work AD without DNS, but I will obey the major myth…

You may see some warning which related to DNS tier. If you have some AD in your network, you may see no warning.

Specify the location for each log. I leaved them default.

Specify the password for “Directory service recovery mode”. If you want to do without your joy, I recommend not to forget.

Installation finished. I rebooted at this point. Machine start to work as Active Directory server.

After the reboot, I created user account for testing.

  1. Install Scientific Linux

As client machine, I installed Scientific Linux 6.0 (x86_64). I included samba packages.

  1. Create /etc/samba/smb.conf

Edit /etc/samba/smb.conf to suit for Active Directry server. I wrote like this.

[global] workgroup = <NetBIOS’s domain name> password server = realm = security = domain idmap backend = tdb idmap uid = 10000-19999 idmap gid = 10000-19999 idmap config : backend = rid idmap config : range = 20000 - 29999 template shell = /bin/bash winbind use default domain = yes winbind offline logon = false dos charset = CP932 unix charset = UTF-8 display charset = UTF-8 You may add sharing option like this.

[nas] path = /home/nas writable = yes 5. Join Linux box to AD forrest

Now, You can join your linux client to Active Directory forest. Issue this command.

net ads join -U Administrator password: <Domain Administrator’s password> You may experience that net command failed to add client’s host name to DNS service. When you experienced, you should add your linux client to DNS manually.

  1. test authentication and see shared file system

You can access shared file system which linux client serves. When you asked user name and password, try them which you’ve set to AD. If everything goes good, you will see shared file system.

  1. using AD authentication for SSH

In addition to share file system, you can use user name and password which you’ve set to AD to some other authentication such as ssh.

First, you have to install winbindd.

yum -y install samba-winbind Next, modify /etc/nsswitch.conf

passwd: files winbind shadow: files winbind group: files winbind Finally, start winbindd service.

chkconfig winbindd on # service winbindd start If you have good experience about system-config-authentication, it may be good to use it. ( I think it is just a little bit confusing… )

Sharing NFSv4 between solaris server and linux client

When you’ve mount NFSv4 filesystem from linux client to solaris server, you may experience user and group goes “nobody”.

First, check proper export setting.

1
share -F nfs -o rw,sec=sys,root=@xxx.xxx.xxx.xxx/24 /filesystem

According to man page of share_nfs, you have to specify proper security and hostname or range of ip address. If you want to set it to ip address, do not forget to set “@” in front of ip address. Otherwise these character is identified as hostname. Again, read man page of share_nfs carefully !

Next, check /etc/idmapd.conf in client.

1
2
[General]
Domain = mydomain

You may set your domain name, I think.

Finally, check the service setting. You also have to proper setting for mount.

1
2
3
rpcbind        	0:off	1:off	2:on	3:on	4:on	5:on	6:off
rpcgssd        	0:off	1:off	2:off	3:on	4:on	5:on	6:off
rpcidmapd      	0:off	1:off	2:off	3:on	4:on	5:on	6:off

Enjoy.

DenyHosts for brute force SSH login attacks

I’m using a few hosts for my joy. I can also log into these hosts from outside of my home via Internet. This is very useful ! I only uses SSH for my safety and other port have been closed, so many of threat is shut out. But many brute-force attackers try to log into my server via SSH day by day. This useless trial is very noisy. Many of them feels so same like me. So, let me write about denyhosts. HowToForge writes good article. I’ve referred this article. I’m using Scientific Linux 6.0 (x86_64). So first, I enabled epel repository. Please refer this wiki page how to enable epel repository. This article also works with Scientific Linux. and, install denyhosts. # yum install denyhosts Default configuration file (/etc/denyhosts.conf) is suit for SSH limitation. If you only want to limit SSH login trial, leave it default. finally, enable denyhosts and start it. # chkconfig denyhosts on # service denyhosts start That’s it. If your server experienced brute force attack, you’ll got mail like this. From: DenyHosts nobody@loginserver.myhome To: root@loginserver.myhome Subject: DenyHosts Report from loginserver.myhome Date: Mon, 30 May 2011 21:15:43 +0900 Added the following hosts to /etc/hosts.deny: xxx.xxx.xxx.xxx (unluckyserver.domainname) ———————————————————————-

ustreamの録画スクリプトを公開します

公益に資すると思いますのでustreamを見ることができない人、インターネット環境に容易にアクセスできない方に映像を届けることができるように、ustreamの録画スクリプトを公開します。 ダウンロード当初の目的を果たしたと思いますのでダウンロードは停止しました。欲しい方はメールでご連絡ください 使用するためには以下のperlモジュールをインストールしてください。 * utf8

  • Encode
  • Data::Dumper
  • LWP::Simple また以下のコマンドを使用できるようにしてください * rtmpdump 内部でuStreamのDeveloper IDに紐づくAPI keyが入っていますが、そのまま利用いただいて構いません。ただしDeveloper APIの利用は1日に5000回に制限されていますので、可能な限りDeveloper登録をして、API keyを取得し、スクリプト内部のAPI keyを書き換えてください。 uStreamのDeveloper登録は以下のURLから行うことができます http://developer.ustream.tv/home スクリプトについてご不明な点は私までメールいただければできる限り対応します。

今日は自宅サーバにUPSを取り付けた

残念ながら地震の影響で福島原発を含む東京電力の発電能力がかなり低下してしまうようだ。対策を見ていると、どうも近々に復旧の見込みは無いようで、電力が足りないことが長期間続くことになる。政府が節電の呼びかけとともに、輪番停電を実施することを予告している。 確かに節電はやりたい。被災された方には心からお見舞いしたいし、時間の許す限り貢献したいと思う。人によってはこんな時に自宅サーバなんてもってのほかという人もいるだろう。でも現時点で家の中の全てのデータ、メール、インフラの制御を全て自宅サーバにやらせている俺としてはサーバは可能な限り落としたくないものだ。なのでUPSを買って、停電時には自動的にシャットダウンし、復電時には自動的に稼働を開始することにした。 UPSはCyberPower社のBackup CR900(型番: CP900SW JP)を買った。ヨドバシカメラで22,000円程度。出力も540Wと値段にしては非常に大きい。Linuxに対応していることも選択のポイントであった。ただ、実際に試験していると100Wほどの負荷であるのにバッテリの減衰は思った以上に速い。10分保てば御の字、といったところ。それでもその間に正しくシャットダウンし電源を停止すれば、データは守られる。 電源の接続自体はなんのことはない。ソフトウェアはホームページからLinux(32bit/64bitあり)をダウンロードすることができる。俺の場合はtarballをダウンロードしCentOS5.5に入れた。USBケーブルでUPSとサーバを接続する。特に問題なく動作する。(素晴らしい!) UPS運用のキモは自動シャットダウンと復電後の自動起動だと思う。各ハードウェアのBIOS設定(復電時に自動的に電源を入れるようにする)、各VMの起動、起動後のサービス動作確認など、スクリプトを作り込み細かな調整をして何度も試験すべき。最終的に電源を抜いて正常シャットダウン、電源を刺して各サービスまで含めて正常起動するようスクリプトを作り込んだ。停電時、サービス復旧時にはSMSでiPhoneにメールも飛ぶようにした。 こちらの準備はOKだ。いざ停電のある世界へ!

Google Authenticatorで2段階認証を行うことができるらしい

それ、Gentooだとどうなる?: Google Authenticatorを使ってLinuxのログイン(PAM)で二段階認証を試す nunnun’s weblog:Google Authenticatorで2段階認証を行う [Debian] こんどやってみよ

今日はkvmの仮想マシンのバックアップ方法を確認した

先週kvmマシンのHDDがクラッシュし、OS+3つのVMを再インストールするはめになった。毎回やるのもダルいので、せめてVMは一発復旧させたいなあといろいろ調べて、なんか確立したっぽいので以下にメモ。 一応我が家はこれで動いているようですがat your own riskでお願いします。復元できなかったりなんか不具合あっても責任取れません ### バックアップ方法

VMを静止した状態で、設定ファイル、メモリイメージ、仮想ディスクをコピーしておけばいい。ディスクイメージの種類はrawでも、qcow2でもいい。具体的なコマンドにすると以下のような感じ

virsh dumpxml > # virsh save # cp ### リストア方法

OSインストール後以下のような感じにする

cp # virsh define # virsh restore いろいろ調べたけど、kvmの場合Live Backupはできないみたいなんだよね・・・。もちろんVMの中でバックアップ動かすのはありだけど。なんかダルいし。花粉症だし。

今日はflybackのバックアップを整理するスクリプトを作った

flybackはとっても便利だ。少ない容量で大量の期間のバックアップを作成することができる。通常バックアップというと、フルバックアップと差分バックアップで、1週間に一度フル、毎日差分、となると、1週間(7日)のバックアップを維持しようとすると、バックアップ元の2.6倍くらいの容量を確保しておく(異論あるかもしれない。俺は職場でそんなふうに教えられた)ようなところが、同じ容量でより多くの、しかも完全なバックアップを持つことができる。 マイコミジャーナル:あのTime MachineをLinuxで? - バックアップツール「FlyBack」が登場 上の記事を読んでFlybackを使い始めてはや3、4年になるが、確かにより頻繁にバックアップでき、より長期間保存できる。今の所バックアップ元をホームディレクトリ(約3G)、バックアップ先を250Gに指定しているが、ほぼ15〜20ヶ月ほどの2時間ごとのバックアップにさかのぼることができる。しかもどの地点にも更新されていないものも含めて全てのファイルがあり、cpコマンドやtarコマンドなどで簡単にリストアすることができる。すごい。 ただ唯一の欠点は、過去のバックアップの削除は完全に手動になってしまう所。更新されていないファイルはハードリンクになるので、削除しても削除しても容量が減らず、どこまで削除していいかわからないので、今まではえいやで2、3ヶ月まとめて削除していた。ただFlybackのインスパイヤ元のTimemachineはその辺りも考慮されていて、過去のバックアップは適宜間引いて残すようにしている。過去1ヶ月のものは1日おき、それ以前は1週間おき、という感じに。 やっぱりFlybackでも同じことをしたいなあというのが動機。 で、作った。perlスクリプト(ダウンロード)。 注意事項:ある程度テストはしていますが完全に動作する保証はありません。あなたの大切なバックアップが消えても何ら責任は取れません。未実装の機能が若干あります。 cronから実行することを想定してます。コマンドパスはOpenIndiana想定なので環境に合わせて適宜変えていただきたい。Perlモジュールについては各自なんとかしていただきたい。Flyback使ってる人が何人いるのかわからないけど、誰かが便利だなあと思ってくれるとうれしい。

今日はLinuxのCUPSプリントサーバをAirPrintサーバにして、iPhoneからAirPrintで印刷するとPDFファイルが生成されるようにしてみた

ほぼここ(Ryan Finnie’s Blog: AirPrint and Linux)の邦訳になってしまうけど、やってみて、動いたのでやり方を書く。環境はCentOS5.5。 ### 1. まずcups-pdfをインストールする。

rpm -Uvh http://download.fedora.redhat.com/pub/epel/5/i386/epel-release-5-4.noarch.rpm # yum -y install cups-pdf 後で使うのでavahi-daemonも入ってなかったら入れておく。

2. CUPSサーバをネットワーク共有するようにして、印刷できる所まで確認する

iptables使っている場合は631/tcp, 631/udpを解放してアクセスできるようにする

/etc/cups/cupsd.confを編集して、ローカルホスト以外からアクセスできるようにする。編集箇所は赤字で記述。

# “$Id: cupsd.conf.in 7199 2008-01-08 00:16:30Z mike $” # # Sample configuration file for the Common UNIX Printing System (CUPS) # scheduler. See “man cupsd.conf” for a complete description of this # file. # MaxLogSize 2000000000 # Log general information in error_log - change “info” to “debug” for # troubleshooting… LogLevel info # Administrator user group… SystemGroup sys root # Only listen for connections from the local machine. # Listen localhost:631 Listen saba.mydomain:631 Listen /var/run/cups/cups.sock # Show shared printers on the local network. Browsing On BrowseOrder allow,deny # (Change ‘@LOCAL’ to ‘ALL’ if using directed broadcasts from another subnet.) BrowseAllow @LOCAL # Default authentication type, when authentication is required… DefaultAuthType Basic # Restrict access to the server… Order allow,deny Allow 192.168.1.0/24 # Restrict access to the admin pages… <Location /admin> Encryption Required Order allow,deny Allow 192.168.1.0/24 # Restrict access to configuration files… <Location /admin/conf> AuthType Default Require user @SYSTEM Order allow,deny Allow 192.168.1.0/24 できたらcupsを動かして、管理ページが見えるか確認。

chkconfig cups on # service cups start http://saba.mydomain:631/をブラウザで開いて、以下のような管理ページが見えればOK。

ターミナルに戻って、CUPS管理ページが使うSSL証明書を作成する。どうも本来は自動的に作成されるみたいだけど、CentOSのデフォルトでは作成しようとしてハングアップしてしまうみたい。ここを参照して、以下のような感じに作成した。

openssl req -new -x509 -keyout /etc/cups/ssl/server.key -out /etc/cups/ssl/server.crt -days 365 -nodes -config /etc/pki/tls/openssl.cnf Generating a 1024 bit RSA private key ..++++++ ………………..++++++ writing new private key to ‘/etc/cups/ssl/server.key’ —– You are about to be asked to enter information that will be incorporated into your certificate request. What you are about to enter is what is called a Distinguished Name or a DN. There are quite a few fields but you can leave some blank For some fields there will be a default value, If you enter ‘.’, the field will be left blank. —– Country Name (2 letter code) [GB]:JP State or Province Name (full name) [Berkshire]:Tongking Locality Name (eg, city) [Newbury]:Setaganya Organization Name (eg, company) [My Company Ltd]:orenocompany Organizational Unit Name (eg, section) []: Common Name (eg, your name or your server’s hostname) []:saba.mydomain Email Address []:root@saba.mydomain 再度ブラウザに戻って、プリンタを作成していなければ作成する。最終的に以下のような感じになっていればいいと思う。デフォルトプリンタにするかどうかは関係ないっぽい。

ここまでできたら他のPCから印刷できるかどうか確認する。ここではMac(Mac OS X 10.6.6)を使った。

3. AirPrint対応のプリンタを作成する

ここまででCUPSで作成したプリンタをPCで共有できるようになったので、そのプリンタをiPhoneのAirPrint対応にする。

AirPrintはマルチキャストDNS(mDNS。BonjourとかAvahiとか)でプリンタを発見するようだ。CUPSもAvahi経由でmDNS経由でプリンタとして見えてはいるが、そのままではAirPrintが見つけてくれないので、若干設定を追加してやる必要がある。

まずはmDNSで見えるプリンタの情報を取得するために、avahi-discoverを使う。CentOSの場合はavahi-toolsを入れれば使えるようになる。

yum -y install avahi-tools で、avahi-discoverを起動する。Xのウィンドウが出てくる。

avahi-discover

eth0 IPv4 -> local -> Internet Printer の下に、作成したプリンタがある。これをクリックする。

表示が変わるが、これだと後で加工しにくいので、ターミナルに出ている文字の方を使う。以下のような感じ。(適宜改行を入れてます)

Service data for service ‘CUPS-PDF Printer @ saba.mydomain’ of type ‘_ipp._tcp’ in domain ’local’ on 2.0: Host cups.local (192.168.2.5), port 631, TXT data: [ ‘org.freedesktop.Avahi.cookie=3326001564’, ‘pdl=application/pdf,application/postscript,application/vnd.cups-raster,application/octet-stream,image/png’, ‘Duplex=T’, ‘Color=T’, ‘Binary=T’, ‘Transparent=T’, ‘printer-type=0x301E’, ‘printer-state=3’, ‘product=(PostScript Printer)’, ’note=saba.mydomain’, ’ty=Generic PostScript Printer Foomatic/Postscript (recommended)’, ‘rp=printers/pdfprinter’, ‘qtotal=1’, ’txtvers=1’] 上記の出力を参考にして、/etc/avahi/services/<名前>.serviceを作る。<名前>の部分はなんでもいい。以下のような感じ。

注意点としては

  • txt-recordを書く順番はavahi-discoverの出力順の逆
  • txt-recordの最後にURF=noneを入れる

service avahi-daemon restart そうしたらiPhoneからプリンタが見えてるかどうか確認して、印刷!

Enjoy!

それにしてもscreenコマンドが便利過ぎる

いままではnohup command > log 2>&1 &とかしてたけど、screenコマンドを思い切って使い始めてからあっというまに手放せなくなった。出かける時には[Ctrl]+[a],[d]でデタッチしておいて、帰ってきたらscreen -rで元の画面を呼び出せる。超便利。 @IT: ターミナルを切り替えて使えるscreenコマンドとは

flybackは過去のバックアップを消すのがめちゃくちゃ時間がかかる

きっかけはバックアップ先のzfsボリュームがフルになったので、昔のものを減らそうかなと、rm -rf ./2009とかしたら3日経っても終わらないorz。別にそんなに大層なほどやってないんだけどなファイル数30,000弱、ディレクトリ数3,000弱のホームディレクトリなんだが。2009年8月〜2009年12月の毎日2時間に1回なんで、12305(30000 or 3000)で5,400万ファイル(ほとんどがハードリンク)、540万ディレクトリか。rmのパフォーマンスが悪いだけなんだろうか?

今日はリポジトリサーバが壊れた

LVMでディスク全体を追加して再起動したらLV再構成できず起動してこなくなった。現在データ修復中。I/O Intensiveな作業はどうしても待ち時間が多くなる。しょうがないからバイトヘルでもするか。 ・・・そういえばzfsってその辺のメタデータ管理ってどこでやってるんだ?と調べたら、vdevの先頭とお尻に4つ書かれるようだ(PDF注意)。パーティションテーブルはいじってないと。やっぱzfsがいいなあ。

ネットワークの帯域幅を計測するのはNetPIPEがいいみたい

pingpongよりもいいらしい。よくわかんないけど結構使っている人も多いようだ。CentOSならdagリポジトリに入ってるのでインストールも簡単。 使い方は、まず受信(?)側で # NPtcp としておいて、送信(?)側で # NPtcp -h <受信側ホスト名> とすればいい。だららっと出力が出る。こんな感じ。両方ともギガイーサだから900Mbpsでるんだな。普段こんな帯域お目にかかったことがないけど。 Send and receive buffers are 16384 and 87380 bytes (A bug in Linux doubles the requested buffer sizes) Now starting the main loop 0: 1 bytes 1355 times –> 0.10 Mbps in 72.74 usec 1: 2 bytes 1374 times –> 0.21 Mbps in 72.76 usec 2: 3 bytes 1374 times –> 0.31 Mbps in 72.93 usec (中略) 121: 8388605 bytes 3 times –> 890.35 Mbps in 71882.16 usec 122: 8388608 bytes 3 times –> 890.15 Mbps in 71898.33 usec 123: 8388611 bytes 3 times –> 890.33 Mbps in 71883.49 usec

今日はkickstartでxenカーネルを入れるようにした

だんだん本題に入りつつある。先日作成したkickstartファイルを編集して、インストール時にxenカーネルを入れるようにする。起動時にど のカーネルで上がるようにするかは明示していないが、xenカーネルしかインストールしなければxenカーネルで上がってくるようだ。以下 kickstartファイル。赤字が変更部分。 # cat /var/www/html/ks_cent54.cfg # Kickstart file automatically generated by anaconda. install #cdrom url –url http://172.16.0.1/dist repo –name=released –baseurl=http://172.16.0.1/dist repo –name=ore –baseurl=http://172.16.0.1/ore lang en_US.UTF-8 #keyboard jp106 keyboard us network –device eth0 –bootproto dhcp #rootpw –iscrypted $1$.DqY.ln7$yOJvWGbmFjuU6aiPwF9KA0 rootpw password firewall –enabled –port=22:tcp authconfig –enableshadow –enablemd5 selinux –disabled timezone Asia/Tokyo bootloader –location=mbr –driveorder=hda # The following is the partition information you requested # Note that any partitions you deleted are not expressed # here so unless you clear all partitions first, this is # not guaranteed to work clearpart –all –drives=sda part /boot –fstype ext3 –size=100 –ondisk=sda part pv.2 –size=0 –grow –ondisk=sda volgroup VolGroup00 –pesize=32768 pv.2 logvol swap –fstype swap –name=LogVol01 –vgname=VolGroup00 –size=768 –grow –maxsize=1536 logvol / –fstype ext3 –name=LogVol00 –vgname=VolGroup00 –size=1024 –grow %packages @admin-tools @base @core @development-libs @development-tools @editors @ftp-server @java @java-development @legacy-network-server @legacy-software-development @legacy-software-support @mail-server @network-server @ruby @server-cfg @system-tools @text-internet @web-server @smb-server -kernel -kernel-PAE kernel-xen kmod-atl1e-xen xen libvirt virt-manager keyutils kexec-tools trousers fipscheck device-mapper-multipath perl-Convert-ASN1 imake audit

今日は細かいところを整理してみた(my homebrewed cluster part.4)

前回でだいたいできたけど、今日は細かいところを少し整理した。 やること 2.
2. IPアドレスを固定で振りたい。IPアドレスのアサイン自体はDHCPサーバでやりたいけど、MACアドレス見て固定で割り付けたい。DHCPサーバにあと登録していないMACアドレスからのDHCP要求は無視するようにしたい 4. PXEブート時に放っておいたらローカルのHDDから起動するようにしたい。そうするとOS配布用サーバを生かしたままクライアントを起動しても起動時間が少し長くなるだけでオッケイになるので。前回の宿題事項だったので。

じゃあ逝ってみようか! 1.DHCPサーバでIPアドレスを固定する

/etc/dhcpd.confで設定する。赤字が該当部分。

cat /etc/dhcpd.conf ddns-update-style interim; ignore client-updates; deny unknown-clients; # ここで登録していないMACアドレスからの要求は拒否する・・・と思う。多分。 default-lease-time 21600; max-lease-time 43200; allow booting; allow bootp; subnet 172.16.0.0 netmask 255.255.0.0 { # — default gateway option routers 172.16.0.1; option subnet-mask 255.255.0.0; range 172.16.10.1 172.16.10.254; default-lease-time 21600; max-lease-time 43200; host cluster0_1 { hardware ethernet 0:26:18:d2:85:72; fixed-address 172.16.10.1; } host cluster0_2 { hardware ethernet 0:26:18:d2:85:82; fixed-address 172.16.10.2; } host cluster0_3 { hardware ethernet 0:26:18:d2:85:9c; fixed-address 172.16.10.3; } class “pxeclients” { match if substring(option vendor-class-identifier, 0, 9) = “PXEClient”; next-server 172.16.0.1; filename “linux-install/pxelinux.0”; } } 書いたらservice dhcpd restartでdhcpdを再起動。登録していないMACからのIP割当要求はこんなかんじにignoreしていた。/var/log/messages抜粋。3行目は他のDHCPサーバ(Opensolaris上のDHCPサーバ。192.168.2.12。)が要求に答えている様子、なのかな?

Jan 31 21:51:28 localhost dhcpd: DHCPDISCOVER from 00:1b:63:34:e5:58 via eth1: unknown client Jan 31 21:51:29 localhost dhcpd: DHCPDISCOVER from 00:1b:63:34:e5:58 via eth1: unknown client Jan 31 21:51:30 localhost dhcpd: DHCPREQUEST for 192.168.2.35 (192.168.2.12) from 00:1b:63:34:e5:58 via eth1: ignored (not authoritative). 2.PXEブート時に放っておいたらローカルのHDDから起動するようにしたい

前回うまくいかなかったところを直した。結果で言うと、localbootじゃなくて、chain.c32を使えばいいみたい。まずchain.c32を/tftpbootにコピーする。

cp /usr/lib/syslinux/chain.c32 /tftpbot/linux-install 以下修正した/tftpboot/linux-install/pxelinux.cfg/defaultの内容。赤字が修正部分。

cat default default local timeout 100 prompt 1 display msgs/boot.msg F1 msgs/boot.msg F2 msgs/general.msg F3 msgs/expert.msg F4 msgs/param.msg F5 msgs/rescue.msg F7 msgs/snake.msg label local # localboot 1 # chain.c32 hd# [partition_no]と指定する。partition_noを省略するとMBRが呼び出されるみたい kernel chain.c32 append hd0 label 0 # localboot 1 kernel chain.c32 append hd0 label 1 kernel CentOS4.5/vmlinuz #append initrd=CentOS4.5/initrd.img ramdisk_size=8419 method=http://172.16.0.1/dist ip=dhcp append initrd=CentOS4.5/initrd.img ramdisk_size=8419 ksdevice=eth0 ks=http://172.16.0.1/ks_cent54.cfg devfs=nomount ip=dhcp 3.報告書作成


これこれ

4.脳内反省会

次にいこうかもうちょっといろいろ周辺を整理しようか悩む・・・。やるとすれば、DNS, NTPを追加で立てるべきかな・・・。あと192.168.2.x〜172.16.x.xを透過的に通すようにすべきか・・・。う〜ん。

今日はベニヤサーバにOSを入れてみた(my homebrewed cluster part.2)

  1. 今日はOSを入れるぜ

前回まででハードウェアは大体組めた。現状は以下のような構成になっている。

draw100104-1

まずはCentOSでpxeboot&kickstartでOSのインストールをできるだけ省力化しようと努力してみた。

  1. インストールサーバの準備

2.1. CentOS5.4をVirtualBox上の仮想サーバとして作る

Macbookから、“ssh -X user@opensolaris"としてログインし、VirtualBoxを起動してXをMacbookに飛ばしてくる。Mac超便利!とりあえずディスクサイズは最大20GBの可変サイズで作成。

作成後は一旦シャットダウン。ネットワークデバイスをブリッジ接続にしてブート。

2.2. インストール用リポジトリを展開する

インストールできたら、インストールに使用したDVDから、ネットワークインストール用に内容をコピーする。

mount -o ro /dev/cdrom /media/cdrom # mkdir -p /var/www/html/dist # cd /media/cdrom # tar cf - . | ( cd /var/www/html/dist ; tar xvf - ) ブラウザからhttp://virtualserver/dist/で内容が見れることを確認。

2.3. TFTPサーバを構成する

Red Hat(CentOS)にはsystem-config-netbootというGUIツールで比較的容易にTFTPサーバを構成できるツールがあるのでこれを使ってみる。

yum –disablerepo=* –enablerepo=c5-media install system-config-netboot* で、インストールしたら"system-config-netboot"で起動。

sc100104-1

“Network Install"を選択。

sc100104-2

[Operating system identifier], [Description]には識別可能な文字列 [Select protocol for installation]は"HTTP” [kickstart]は(とりあえず今は)空欄 [Server IP Address]にはHTTPサーバのIPアドレス(この場合は172.16.0.1)※OKボタンを押した時点でここにHTTPで到達可能なようにしておくこと。 [Location]はDocumentRootからの相対アドレス

を書く。で、OK。

次はクライアント側。

sc100104-3

ここはクライアント側のIPアドレスだけ入れてOK。

できあがったtftpdの設定は以下のようになっている。

cat /tftpboot/linux-install/pxelinux.cfg/default default local timeout 100 prompt 1 display msgs/boot.msg F1 msgs/boot.msg F2 msgs/general.msg F3 msgs/expert.msg F4 msgs/param.msg F5 msgs/rescue.msg F7 msgs/snake.msg label local localboot 1 label 0 localboot 1 label 1 kernel nodeA/vmlinuz append initrd=nodeA/initrd.img ramdisk_size=8419 method=http://172.16.0.1/dist ip=dhcp ここにある"nodeA/vmlinuz”, “nodeA/initrd.img"はそれぞれ”/tftpboot/linux-install"からの相対パスになっている。

2.4. DHCPサーバを構成する

次にDHCPサーバを構成する。まずはインストール。

yum –disablerepo=* –enablerepo=c5-media install dhcp # cp /usr/share/doc/dhcp-3.0.5/dhcpd.conf.sample /etc/dhcpd.conf cp: overwrite `/etc/dhcpd.conf’? y /etc/dhcpd.confを編集する。赤字部分がpxebootに関係する部分。

ddns-update-style interim; ignore client-updates; allow booting; allow bootp; default-lease-time 21600; max-lease-time 43200; subnet 172.16.0.0 netmask 255.255.0.0 { option routers 172.16.0.1; option subnet-mask 255.255.0.0; range 172.16.10.1 172.16.10.254; default-lease-time 21600; max-lease-time 43200; class “pxeclients” { match if substring(option vendor-class-identifier, 0, 9) = “PXEClient”; next-server 172.16.0.1; filename “linux-install/pxelinux.0”; } } ここまできたら、dhcpdとtftpdを動かす。

chkconfig dhcpd on # /etc/init.d/dhcpd start # chkconfig tftp on # chkconfig xinetd on # /etc/init.d/xinetd restart クライアント側は事前にPXE起動できるようBIOS設定しておく。キーボード、ネットワークケーブル、VGAモニタをつけて電源を入れる。以下のような画面が出れば成功。[1]キーをタイプして"nodeA"のブートプロセスに移行する。

cimg1358

ただしこのままブートプロセスを進めると、以下のように通常のインストールになってしまうので、次はkickstartの設定を追加する。

cimg1359

2.5. kickstartファイルを用意する

kickstartファイルはインストールサーバをインストールした時に/rootにできているanaconda-ks.cfgをベースに少し変更する。赤字部分が変更したところ。

Kickstart file automatically generated by anaconda. install #cdrom url –url http://172.16.0.1/dist lang en_US.UTF-8 keyboard jp106 network –device eth0 –bootproto dhcp #rootpw –iscrypted $1$J1wcQuxw$sfIj335v9EAHSm1Kct9UU1 rootpw password firewall –enabled –port=22:tcp authconfig –enableshadow –enablemd5 selinux –disabled timezone Asia/Tokyo bootloader –location=mbr –driveorder=hda # The following is the partition information you requested # Note that any partitions you deleted are not expressed # here so unless you clear all partitions first, this is # not guaranteed to work #clearpart –all –drives=hda clearpart –all –drives=sda part /boot –fstype ext3 –size=100 –ondisk=sda part pv.2 –size=0 –grow –ondisk=sda volgroup VolGroup00 –pesize=32768 pv.2 logvol swap –fstype swap –name=LogVol01 –vgname=VolGroup00 –size=768 –grow –maxsize=1536 logvol / –fstype ext3 –name=LogVol00 –vgname=VolGroup00 –size=1024 –grow %packages @admin-tools @base @core @dns-server @development-libs @development-tools @editors @ftp-server @java @java-development @legacy-network-server @legacy-software-development @legacy-software-support @mail-server @network-server @ruby @server-cfg @system-tools @text-internet @web-server @smb-server keyutils kexec-tools trousers fipscheck device-mapper-multipath perl-Convert-ASN1 imake audit で、これを/var/www/html以下におく。

mv ks_cent54.cfg /var/www/html # chmod 644 /var/www/html/ks_cent54.cfg で、/tftpboot/linux-install/pxelinux.cfg/defaultを編集する。赤字が変更部分。

default local timeout 100 prompt 1 display msgs/boot.msg F1 msgs/boot.msg F2 msgs/general.msg F3 msgs/expert.msg F4 msgs/param.msg F5 msgs/rescue.msg F7 msgs/snake.msg label local localboot 1 label 0 localboot 1 label 1 kernel nodeA/vmlinuz # append initrd=nodeA/initrd.img ramdisk_size=8419 method=http://172.16.0.1/dist ip=dhcp append initrd=nodeA/initrd.img ramdisk_size=8419 ksdevice=eth0 ks=http://172.16.0.1/ks_cent54.cfg devfs=nomount ip=dhcp これで変更はおわり。クライアント側をもう一度起動してみる。

  1. じゃあクライアントにインストールしてみる→失敗する訳だがorz

で、クライアントを起動してみると、kickstartファイルの読み込みに失敗する。(ハードウェアの構成によってはここで読み込める人もいるかもしれない。その人はここで終わり。Enjoy!)

cimg1361

で、[Alt]+[F4]キーでログを見てみると、ネットワークデバイスドライバが読み込めていないのでネットワークに繫げられていないことがわかる。

そういえば前回、ネットワークカードの設定をしながら「これってAtherosのネットワークチップなんだ・・・」と思っていたが。で、マザーボード(P5KPL-AM EPL)のメーカーAsusのホームページを見てみると、Linux用にドライバが用意されている。おお!これ組み込めばいいんじゃね?となる。

  1. ネットワークドライバをpxebootで使用するinitrd.imgに追加する

以下さらっと書いてますがかなり試行錯誤しました・・・。

まずASUSのページからダウンロードしたドライバをインストールサーバにおいて、展開する。

mac$ scp LinuxDrivers.zip root@instserver:/root root@instserver’s password: LinuxDrivers.zip 100% 4586KB 4.5MB/s 00:01 mac$ ssh root@instserver root@instserver’s password: Last login: Mon Jan 4 22:53:51 2010 from mac # ls anaconda-ks.cfg install.log install.log.syslog LinuxDrivers.zip # unzip LinuxDrivers.zip 展開先のディレクトリに移動し、ドライバをmakeする。本来は不要なmake installまでやってるが、ここで変更される内容を後で参照するため。もしかしたらmake installしなくてもいい方法があるのかもしれないがよくわかんない。

cd LinuxDrivers/Lan/src # make make -C /lib/modules/2.6.18-164.el5/build SUBDIRS=/root/LinuxDrivers/Lan/src modules make[1]: Entering directory /usr/src/kernels/2.6.18-164.el5-i686' CC [M] /root/LinuxDrivers/Lan/src/at\_main.o CC [M] /root/LinuxDrivers/Lan/src/at\_hw.o CC [M] /root/LinuxDrivers/Lan/src/at\_param.o CC [M] /root/LinuxDrivers/Lan/src/at\_ethtool.o CC [M] /root/LinuxDrivers/Lan/src/kcompat.o LD [M] /root/LinuxDrivers/Lan/src/atl1e.o Building modules, stage 2. MODPOST CC /root/LinuxDrivers/Lan/src/atl1e.mod.o LD [M] /root/LinuxDrivers/Lan/src/atl1e.ko make[1]: Leaving directory /usr/src/kernels/2.6.18-164.el5-i686’ # make install make -C /lib/modules/2.6.18-164.el5/build SUBDIRS=/root/LinuxDrivers/Lan/src modules make[1]: Entering directory /usr/src/kernels/2.6.18-164.el5-i686' Building modules, stage 2. MODPOST make[1]: Leaving directory /usr/src/kernels/2.6.18-164.el5-i686’ gzip -c ../atl1e.7 > atl1e.7.gz # remove all old versions of the driver find /lib/modules/2.6.18-164.el5 -name atl1e.ko -exec rm -f {} ; || true find /lib/modules/2.6.18-164.el5 -name atl1e.ko.gz -exec rm -f {} ; || true install -D -m 644 atl1e.ko /lib/modules/2.6.18-164.el5/kernel/drivers/net/atl1e/atl1e.ko /sbin/depmod -a || true install -D -m 644 atl1e.7.gz /usr/share/man/man7/atl1e.7.gz man -c -P’cat > /dev/null’ atl1e || true # 次にpxebootで使われるinitrd.imgをほどく。

cd /tftpboot/linux-install/nodeA/ # mkdir initrd # cd initrd # zcat ../initrd.img | cpio -i -c # ls bin dev etc init modules proc sbin selinux sys tmp var # さらにmodules以下にある、各ファイルに変更をくわえる。 まずはドライバ本体(atl1e.ko)をmodules.cgzアーカイブにくわえる。

cd modules # ls module-info modules.alias modules.cgz modules.dep pci.ids # mkdir modulesdir # cd modulesdir # zcat ../modules.cgz | cpio -idv # ls 2.6.18-164.el5 # cd 2.6.18-164.el5/i686/ # cp /root/LinuxDrivers/Lan/src/atl1e.ko . # chmod 744 atl1e.ko # cd ../.. # find .| cpio -c -o | gzip -c9 > ../modules.cgz 27112 blocks # cd .. # rm -rf ./modulesdir # 次に、module-info, modules.alias, modules.dep, pci.idsの各ファイルに適切なエントリを追加する。何が適切かってのは参照するところがあるので以下参照。

まずはmodule-info。赤字が追加内容。インデントのスペースは実際にはタブです。追加の3行目はどんな文字でもいいのかもしれない。よくわかんない。

(前略) ata_piix scsi “Intel PIIX/ICH ATA controllers” atl1e eth “Atheros Gigabit Ethernet” atmel_cs eth “Atmel at76c50x 802.11 PCMCIA wireless ethernet” (後略) 次にmodules.alias。まずは追加する内容を以下のように確認する。赤字部分がそれ。

grep atl1e /lib/modules/2.6.18-164.el5/modules.alias alias pci:v00001969d00001026svsdbcsci* atl1e # で、pxeboot側のmodules.aliasを編集。赤字が追加内容。

alias pci:v00008086d00007010svsdbcsci* ata_piix alias pci:v00001969d00001026svsdbcsci* atl1e alias pcmcia:mcffnpfnpaB474D43Apb6B1FEC94pcpd* atmel_cs 次にmodules.dep。まずは確認。赤字部分がそれ。

grep atl1e /lib/modules/2.6.18-164.el5/modules.dep /lib/modules/2.6.18-164.el5/kernel/drivers/net/atl1e/atl1e.ko: 依存モジュールはないという意味だと思われたので、pxeboot側のmodules.depは特に変更せず。

最後にpci.ids。まずは確認。赤字部分がそれ。

grep atl1e /lib/modules/2.6.18-164.el5/modules.pcimap atl1e 0x00001969 0x00001026 0xffffffff 0xffffffff 0x00000000 0x00000000 0x0 赤字部分を以下のように追加する。インデントのスペースは実際にはタブです。

(前略) 18ca XGI Technology Inc. (eXtreme Graphics Innovation) 0020 Z7/Z9 (XG20 core) 0040 Volari V3XT/V5/V8 1969 Atheros Corp. 1026 Atheros Gigabit Ethernet 197b JMicron Technology Corp. (後略) 最後にinitrd.imgを再作成する。

find .| cpio -c -o | gzip -c9 > ../initrd.img 27809 blocks # これでおしまい。

  1. クライアントインストール再挑戦→成功!

クライアントを再度poweronして、pxebootする。うまく行けばanacondaのStage2まで移行して、インストールが開始される。

cimg1369

後は再起動を促す表示が出たら、再起動。

ただしpxebootを有効にしておくと、再起動後またインストール前の画面になり、通常であれば10秒待てばHDDからブートするはずだがブートしない。これはよくわかんなかった。要調査。とりあえずはdhcpdのpxeclients部を無効にしておけばいい。こんな感じ。/etc/init.d/dhcpd restartも忘れずに。

ddns-update-style interim; ignore client-updates; #allow booting; #allow bootp; default-lease-time 21600; max-lease-time 43200; subnet 172.16.0.0 netmask 255.255.0.0 { option routers 172.16.0.1; option subnet-mask 255.255.0.0; range 172.16.10.1 172.16.10.254; default-lease-time 21600; max-lease-time 43200; # class “pxeclients” { # match if substring(option vendor-class-identifier, 0, 9) = “PXEClient”; # next-server 172.16.0.1; # filename “linux-install/pxelinux.0”; # } } クライアントがインストールしたOSでブートすれば完了。

  1. 報告書作成

これ書いた。

  1. 脳内反省会

  • 疲れた・・・
  • 世の中に情報あんまりないですね・・・
  • HDDブートできるようにしたいなあ・・・
  • インストール時にatl1eドライバも入れたい
  • 他のリポジトリも同時にインストールできるようにしたいなあ こんな感じ!?

topコマンドで出るステータスがちょっと変わっているような気がする

top output us -> User sy -> system ni -> nice id -> idle wa -> iowait hi -> H/w interrupt requests si -> S/w interrupt requests hiとsiって昔はなかったような気がしたけど・・・気のせいかもしれない

ffmpegとImageMagickでよいアニメーションGIFを作る

普通にffmpegでアニメーションGIFを作成すると、カラーマップ固定で作成されて画質が残念クオリティになるのでいろいろ調べてやっつけてみた。まるで実用的じゃない&誰得感否めないがネタ重視で。 こんな感じで。 $ mkdir /hayaidisk $ export MAGICK_TMPDIR="/hayaidisk" $ ffmpeg -i inputfile -an -r 15 -bt 1024k -f mpeg1video -vcodec pam -s 320x240 - | convert -delay 1x15 -loop 0 -limit memory 64 -limit map 128 mpg: - gif: out.gif これでconvertがちゃんと色を最適化したアニメーションGIFを作成してくれる。ディスクの許す限りどれだけ長いアニメーションもOKだぜ!エンコード死ぬほど遅いけどね・・・。

unionmountというものができるらしい。これから。

aufsのページで知った。MLのやりとりを見てるとVFSの上でUnionFSを再実装するような話になっているみたい。なるほど。そしてここにもChristoph Hellwigさんがw。頑張るなぁこの人。 Google SoCでやってるのか。 unionfs-fuseでいいのかもしれないけど。なぜかcp -al が動かないんだよね・・・。コード見てると動きそうな感じもするんだけどなぁ。とりあえずworkaroundとして、素直にFreeBSDにするというのもありかもなー。

どうもネットワーク設定はプロファイル化できるようだった

http://www.linuxhomenetworking.com/forums/showthread.php?t=15822 激しく昔からそうなっていることがわかってorz。正直最近までいちいち設定変えてた。なんというゆとり

flybackはやっぱり素敵かもしれない

いつもFedoraはVMware上で使ってるけど、そこで見たファイルをどこかで使いたい時にいつのまにか鯖側にコピーされているというのはとてもいいかもしれない!この知らない間にイイ感じになっている感がいいね〜。やっぱりコンピュータってのはこうでないと!

iphone用に動画をffmpegでエンコードする

チラ裏的に。 ffmpeg -threads 4 -i -r 29.97 -vcodec libx264 -s 480x272 -flags +loop -cmp +chroma -deblockalpha 0 -deblockbeta 0 -crf 24 -bt 256k -refs 1 -coder 0 -me umh -me_range 16 -subq 5 -partitions +parti4x4+parti8x8+partp8x8 -g 250 -keyint_min 25 -level 30 -qmin 10 -qmax 51 -trellis 2 -sc_threshold 40 -i_qfactor 0.71 -acodec libfaac -ab 128k -ar 48000 -ac 2 こんなのエンコードしてる 【ニコニコ動画】【100MB版】THE IDOLM@STER WAKAMURA RECYCLE VOL.02 (meets Perfume)高画質版+おまけ付 すげぇ。アイドルマスターもPerfumeも知らないけど余裕でお金出すよ!Perfumeにも興味出るね!ニコニコやっぱすげーよ。才能集まりすぎ! more チラ裏の裏。 でも未だにPSGでピコピコ音はさすがにアレというか。最近のゲーム音楽の人はけっこうすごいよ。 こんなのとか 【ニコニコ動画】ファイナルファンタジータクティクス 戦闘曲とか FFT こんなのとか 【ニコニコ動画】浜渦正志のバトルメドレー すげーかっけー。ゲームミュージックサイコー!!

ejabberdを立ち上げ

XMPPプロトコルで動作するIMサーバであるejabberdを起動。これがなぜかDNSでの名前解決を前提としていたためBINDの設定まで行った。鯖側の古いFedoraはrpmではイマイチうまく動かなかったので最新の安定版をtarballからコンパイルしてあっさり起動。PidginとiChatでいろいろいじってみる。なるほどなるほど。 ・・・別に一人でチャットしたいわけじゃなくて。ちょっと下ごしらえです。

自宅内LAN用のDNSを立ち上げ

いままで/ec/hostsで数年特に事足りていたのだが、ejabberdのためにエントリ追加。あればあったで便利なはずなんだけどどうしてもものぐさしてしまっていた。これも元々のFedoraのテンプレを少し直して即完了。全く勉強にならない!!(^^;

家のDNS設定をする

家のプロバイダのDNS正引きがあまりに重くてイライラするので、自前でbindを動かすようにする・・・って今のFedoraだと、デフォルトの設定でDNSプロクシとして動作する設定になってるのね・・・おかげでdaemonを動かす以外にやることがなかった・・・嬉しい反面やることがなくてショボーンな感じ でもおかげで超快適になった!もうプロバイダはDHCPでもいいからグローバルIP振ってくれるだけでいいんじゃないかとも思ったり・・・